This post covers the creation of a static website built with React/Gatsby with the site contents authored within Contentful, a market leading headless, hosted content management service (CMS). The solution includes a build pipeline for automated site builds triggered by content or source code changes.
For simplicity, the web site consists of a single page: an event calendar.
As always, my motivation behind building this solution is to learn or deepen skills and try products from my radar.
I’ve already used GraphQL in previous posts (1. GraphQL intro, 2. GraphQL+AWS+AEM). GraphQL can be considered as a frontend directed technology for fetching or manipulating data in a more personalized manner that highly improves the developer experience and productivity in building and consuming APIs.
However the emphasis in this post is on the combination of Contentful and GatsbyJS in order to utilize the content authoring capabilities while enjoying the benefits and simplicity of a static website.
I spent a couple of years building AEM/CQ5 web sites and I’m hosting this blog on my WordPress server. They are examples for traditional CMS systems. The difference of a headless CMS can be summarized the following way:
From Wikipedia:
“Whereas a traditional CMS typically combines the content and presentation layers of a website, a headless CMS is just the content component and focuses entirely on the administrative interface for content creators, the facilitation of content workflows and collaboration, and the organization of content into taxonomies.”
The other key technology I use is Gatsby. Gatsby is a modern web site generator with a lot of features usually found in Jamstack frameworks and content management systems (CMS). For a feature list refer to their Features Overview page.
A static web page (sometimes called a flat page or a stationary page) is a web page that is delivered to the user’s web browser exactly as stored, in contrast to dynamic web pages which are generated by a web application
Static web sites can be extremely fast. Their source can be stored in version control systems or other data sources and turned into flat files stored on CDNs.
“Gatsby’s vision is to make website development fun by making it simple.”
In our case Gatsby will help generating a website by fetching contents managed within the content management system and building up the site from the page templates and components created in React JS.
The result is a static website that can be hosted without having to install a web server, for example in an AWS S3 bucket.
When new contents are created and published in the CMS, the website needs to be rebuilt. This is usually automated by providing a webhook, a HTTP endpoint that the CMS can invoke when content is published or unpublished, and it can then trigger the build of the site.
This feature is offered by platforms like Gatsby Cloud, but I built my own solution using Google Cloud Platform (GCP) services.
The high level data flow of the solution:
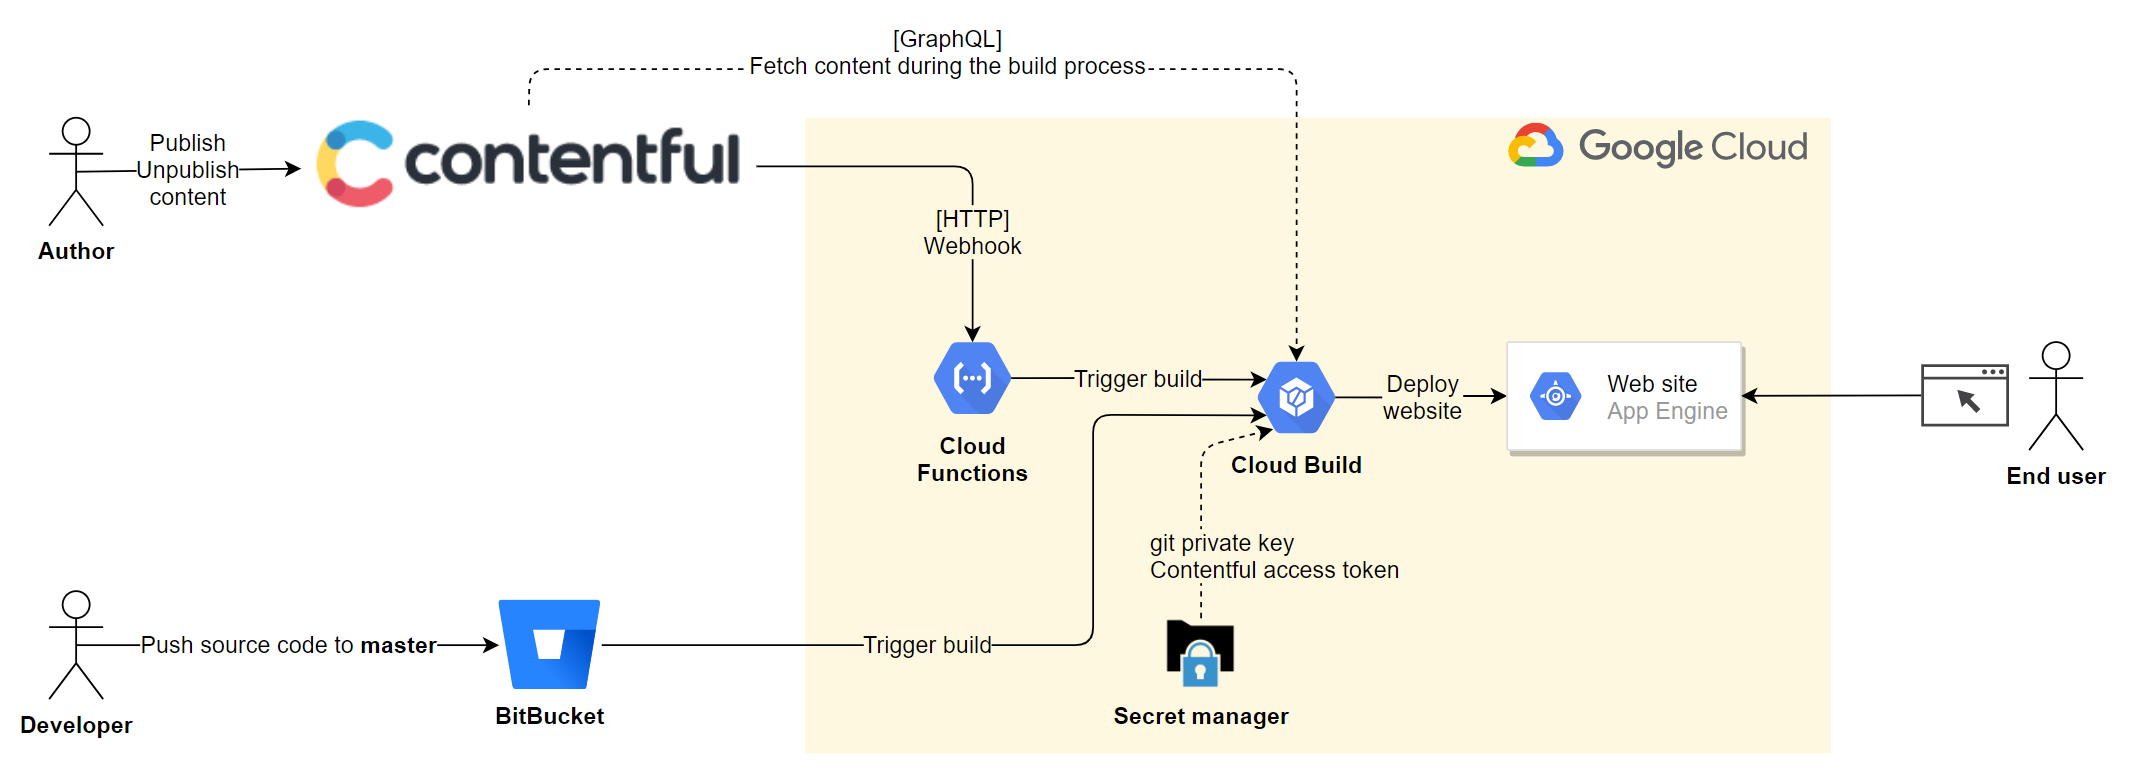
I’m using Google Cloud Build for build & deployment automation. A Cloud function provides the HTTP webhook that can be invoked by Contentful when new content is published.
So the build is triggered in case of the following 2 events:
- When the source code is changed, then a build trigger launches the build procedure.
- When content is changed, the Contentful invokes the Cloud function which then launches the build
I store secrets – like for example my Git key – in Google Secret Manager.
The website is hosted on Google App Engine. I could use a Cloud storage bucket or Amazon S3 bucket, but I choose App Engine because of its additional features and ease of use.
The main steps for building this solution are the following:
- Setup a content model in Contentful and create contents.
- Generate a Gatsby site and connect to Contentful. Then write GraphQL queries that will be used for fetching the contents and create the React components and pages (and the necessary designs) for displaying the contents
- Create the Cloud Build and App Engine deployment scripts for building and deploying the website to Google App Engine.
- Develop a webhook as a Google Cloud Function for triggering the build and configure the webhook in Contentful.
Step 1: Contentful
Setting up a content type
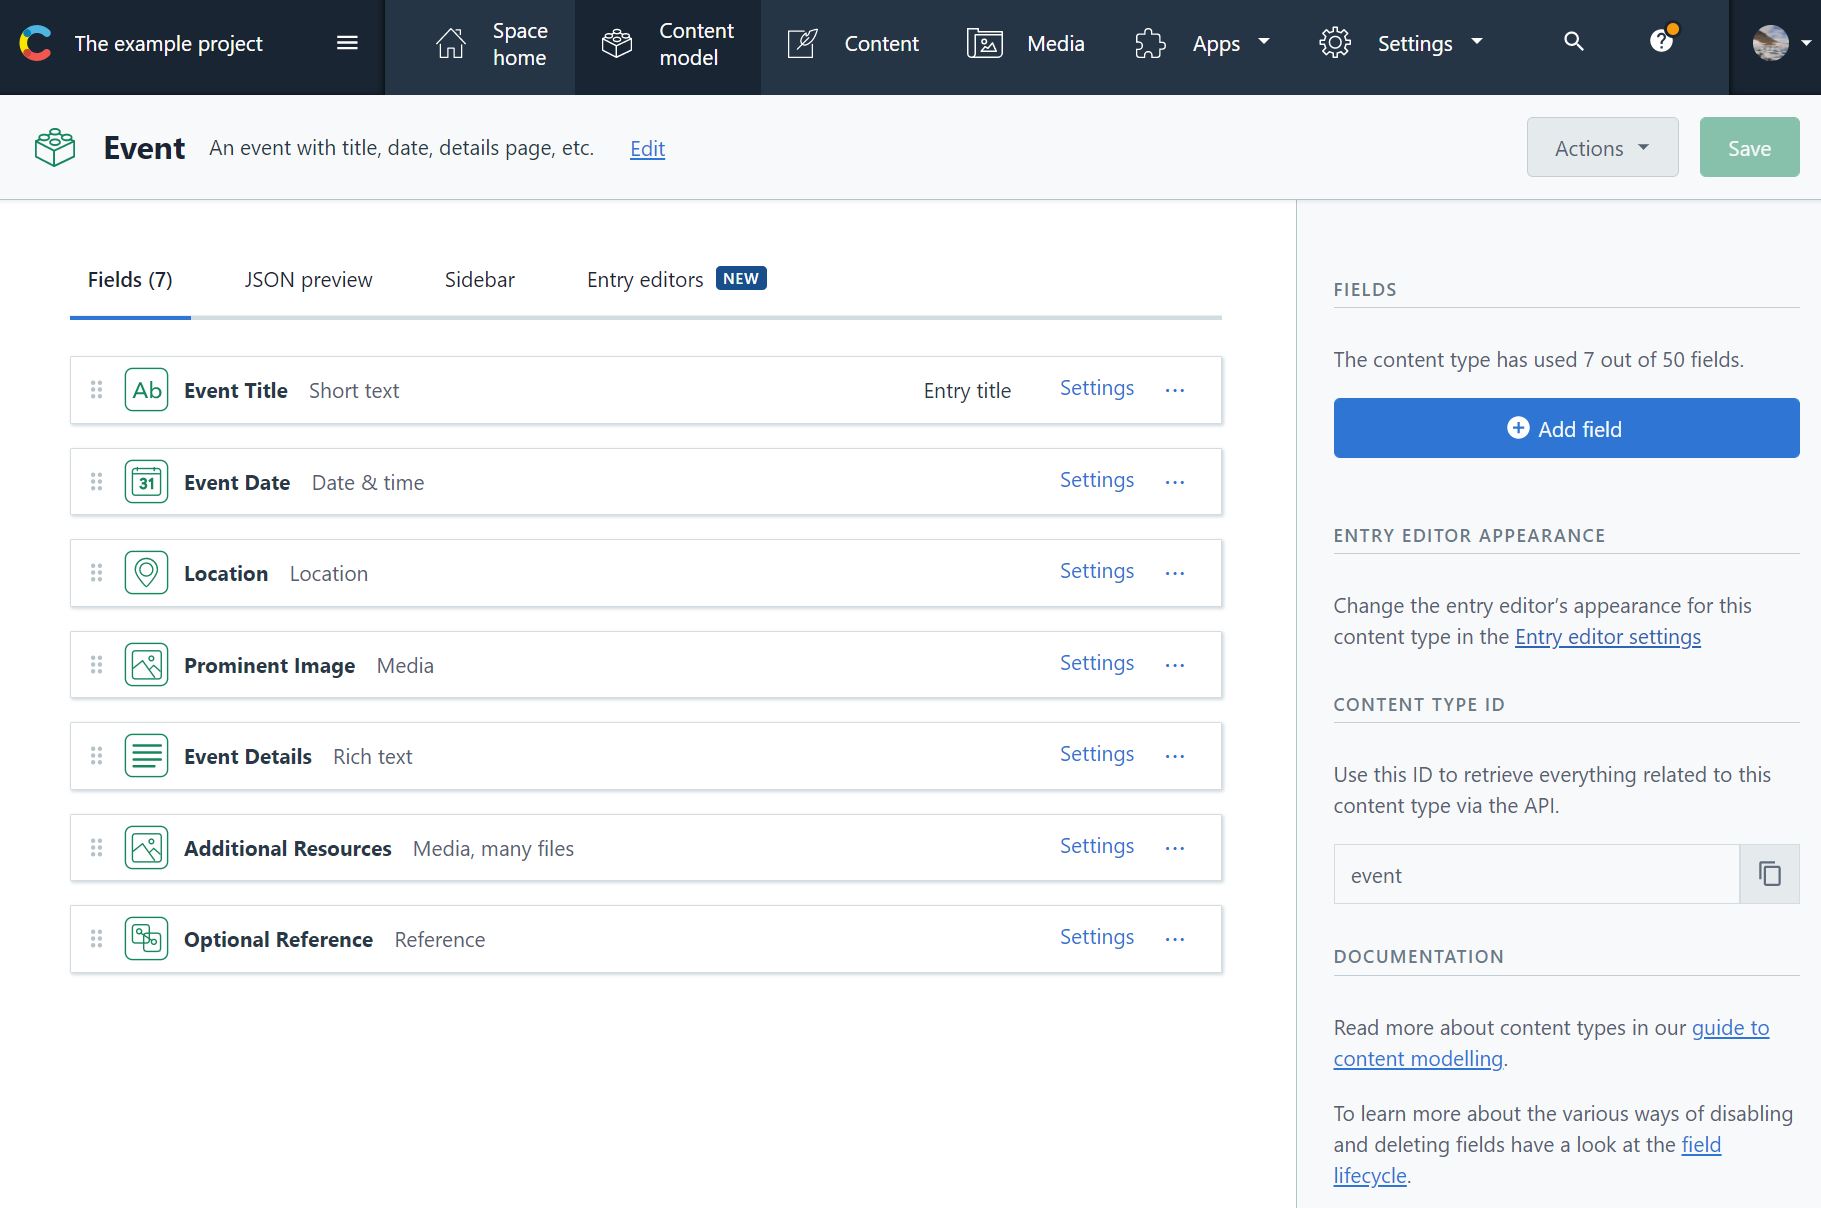
For our site we create a single content type: Event.
An Event item will represent a highlighted, clickable entry in the event calendar.
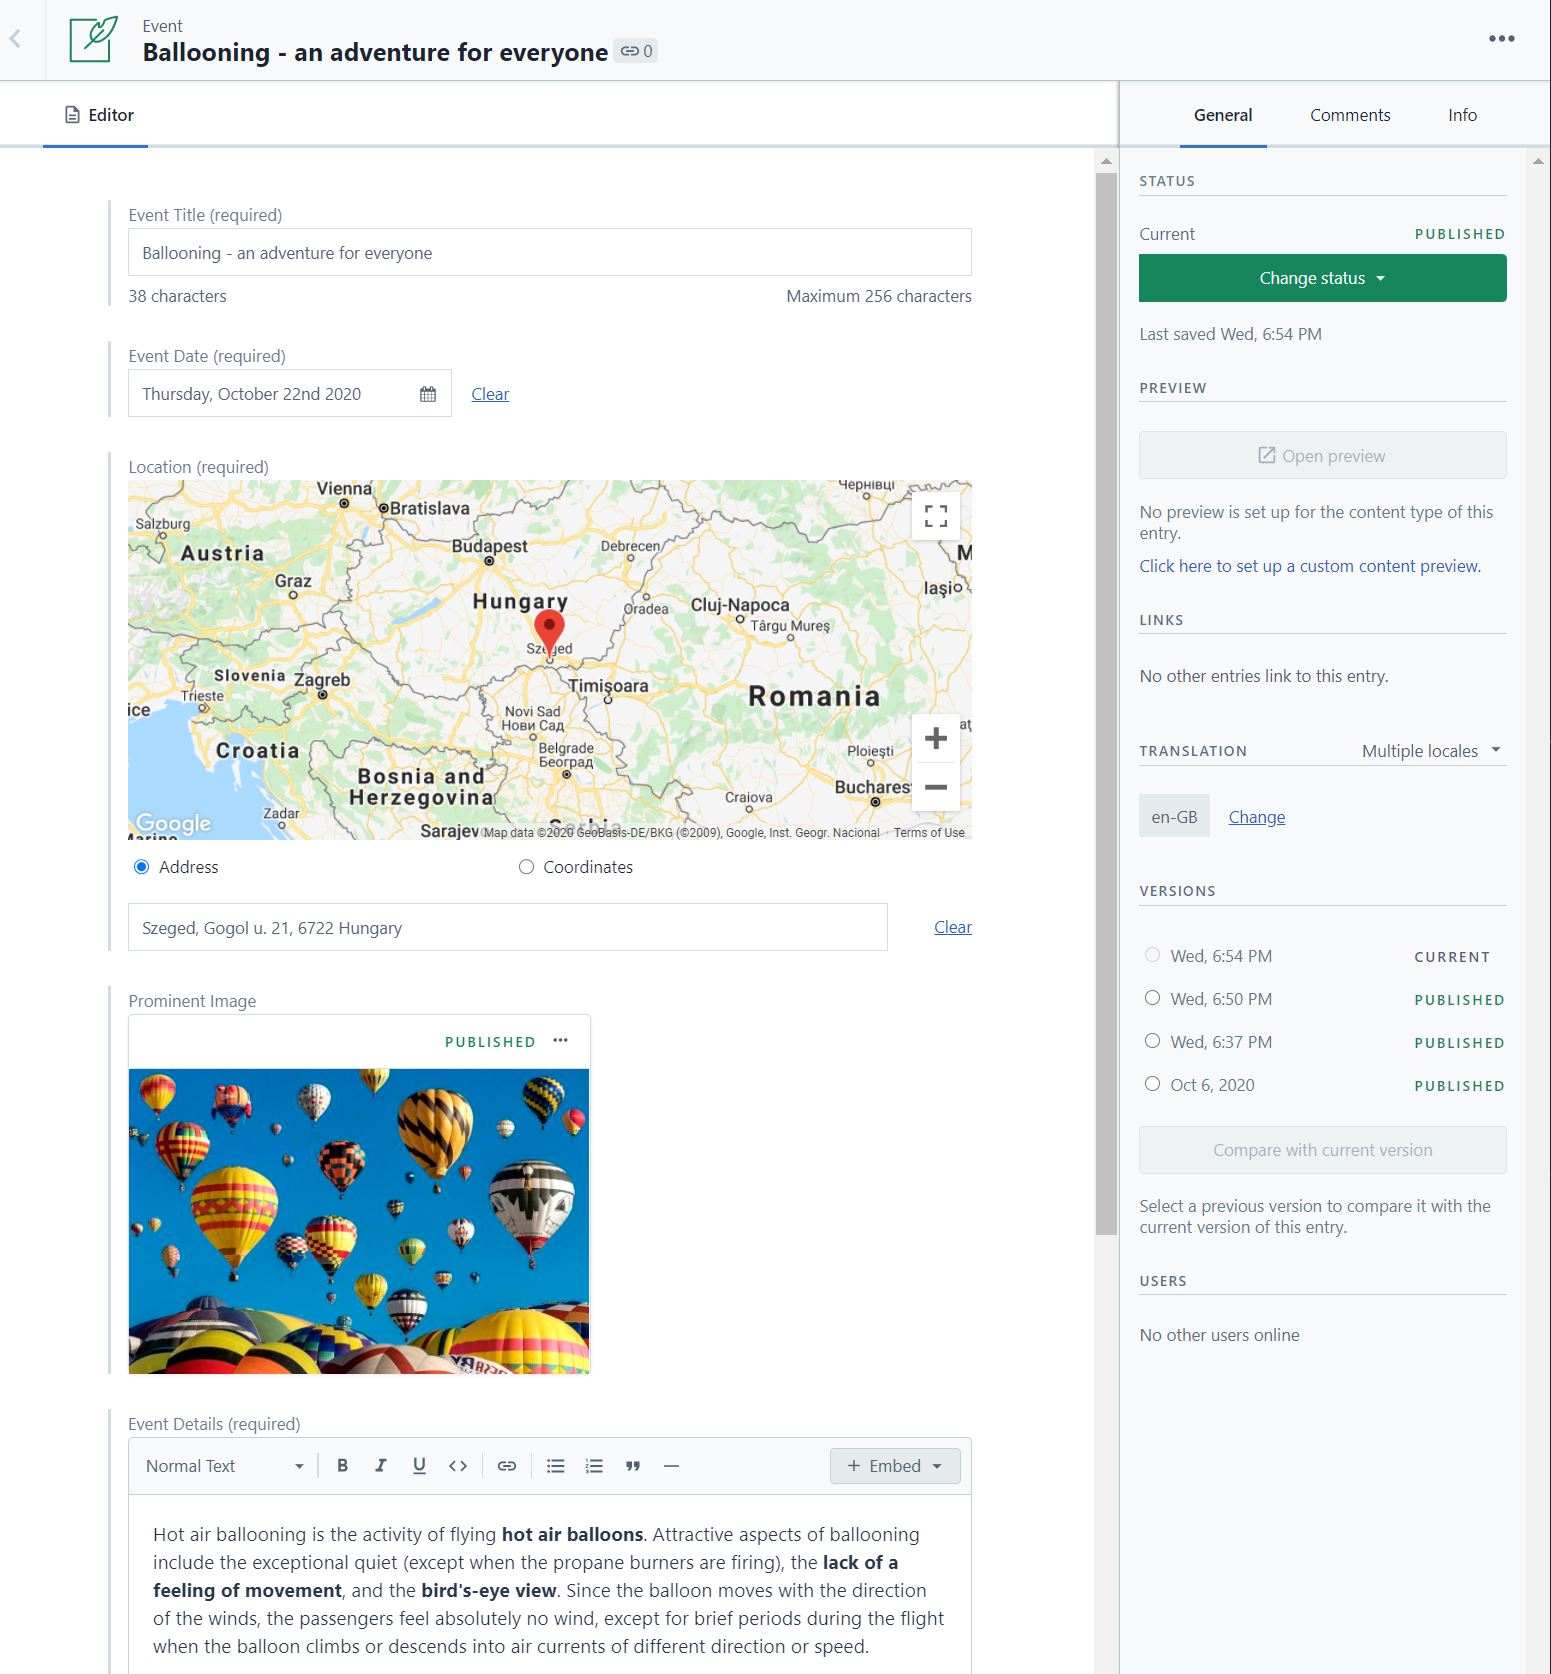
I’ve added various fields to test the platform’s capabilities.
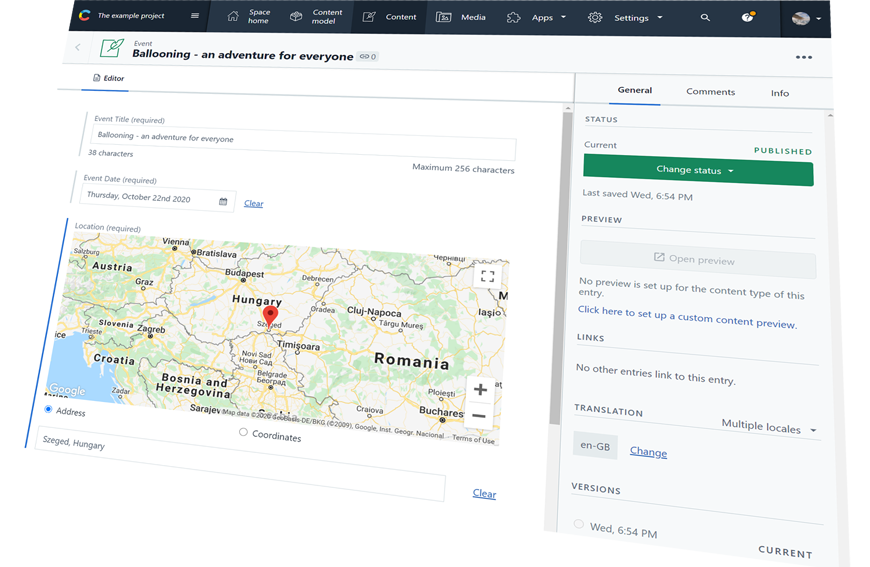
Contentful provides suitable input fields for the different field types. E.g. date picker for dates, map with address/coordinates finder for location fields, etc.
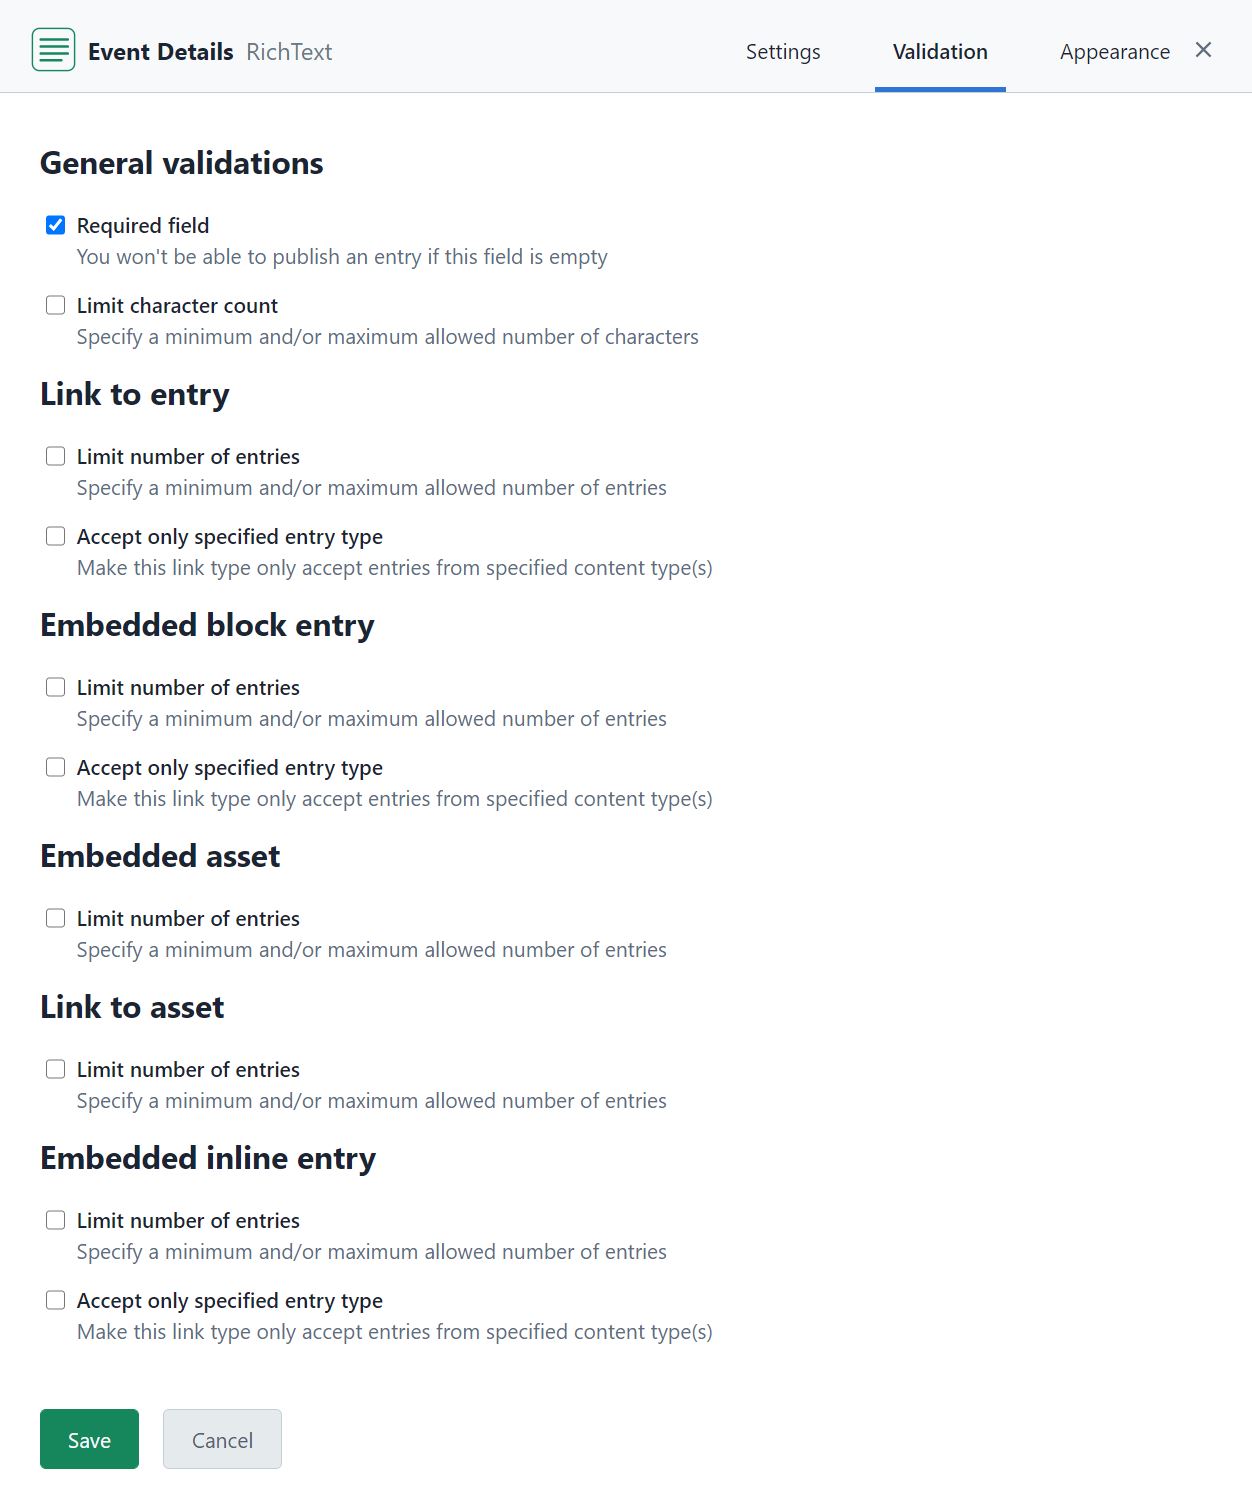
When creating a field, we need to configure its settings, validation and appearance.
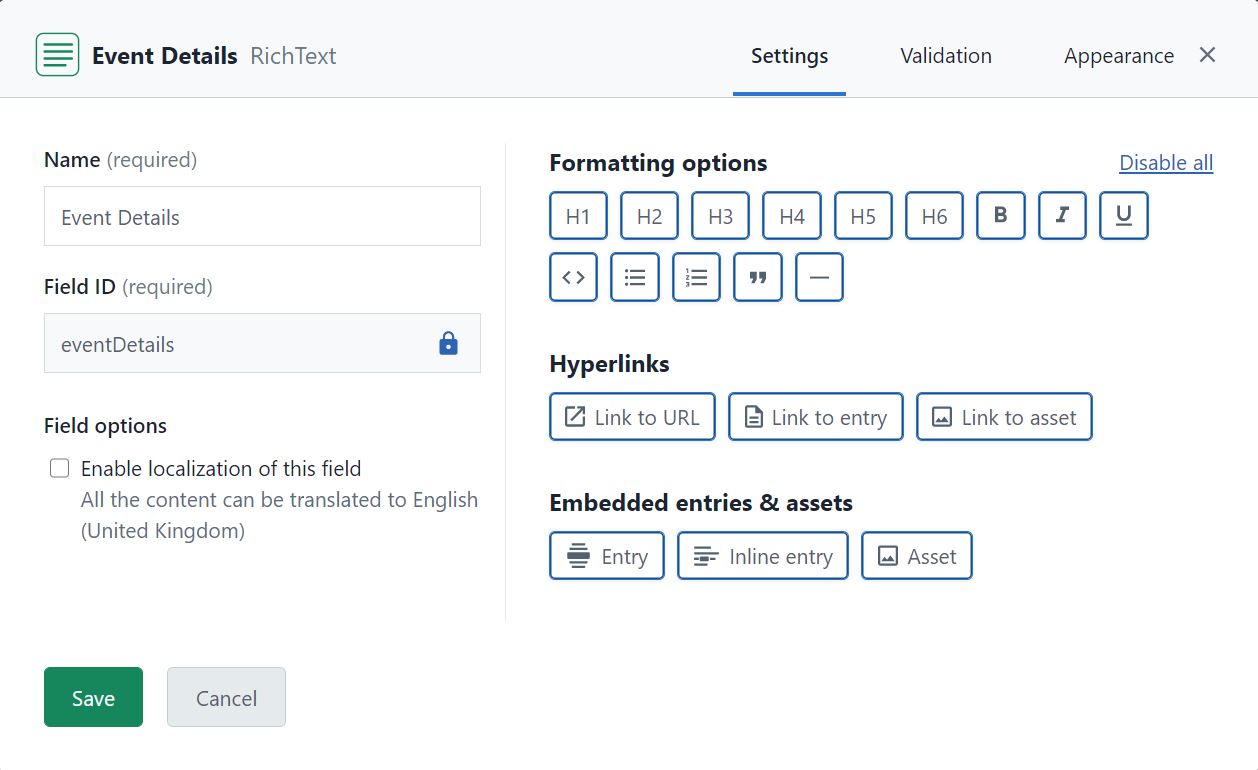
In case of a rich text field, the 3 configuration tabs contain the following.
Settings
Validation
Appearance
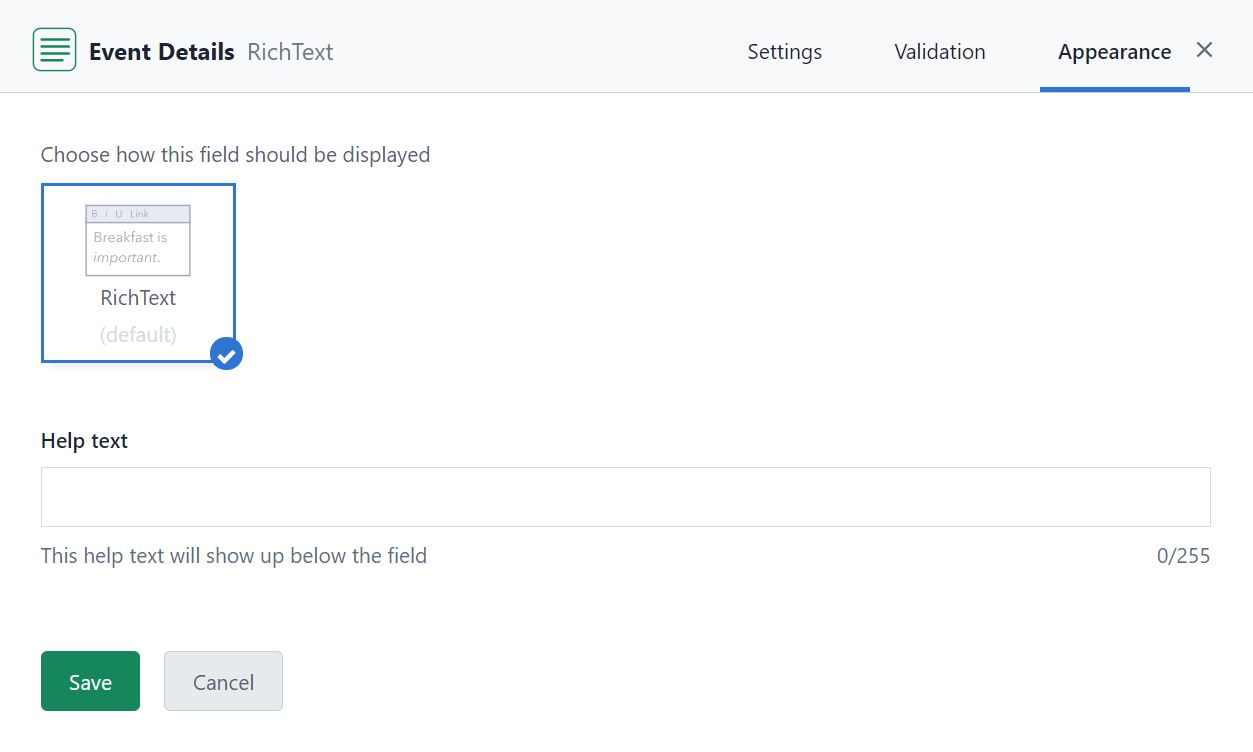
Quite flexible, isn’t it?
In addition to the field level settings, we can also configure the features of the sidebar for the content type’s authoring page. These are mostly the features used in the content editorial process (publishing, preview, versioning, …)
Now that we have the content type in place, lets create sample contents.
Step 2: Create a Gatsby site
To accelerate creating my site I used the Gatsby Contentful starter template.
The starter project comes with a Contentful setup command, where we can configure the Contentful space ID and the Content Delivere / Preview API tokens. They will be stored in environment files. Additionally, various Contentful entities will be imported.
$ npm run setup
...
  To set up this project you need to provide your Space ID
  and the belonging API access tokens.

  You can find all the needed information in your Contentful space under:

  app.contentful.com -> Space Settings -> API keys

  The Content Management API Token
    will be used to import and write data to your space.

  The Content Delivery API Token
    will be used to ship published production-ready content in your Gatsby app.

  The Content Preview API Token
    will be used to show not published data in your development environment.

  Ready? Let's do it! ?

? Your Space ID XXXXXXXX
? Your Content Management API access token XXXXXXXX
? Your Content Delivery API access token XXXXXXXX
Writing config file...
Config file ...\.env.development written
Config file ...\.env.production written
┌──────────────────────────────────────────────────┐
│ The following entities are going to be imported: │
├─────────────────────────────────┬────────────────┤
│ Content Types                   │ 2              │
├─────────────────────────────────┼────────────────┤
│ Editor Interfaces               │ 2              │
├─────────────────────────────────┼────────────────┤
│ Entries                         │ 4              │
├─────────────────────────────────┼────────────────┤
│ Assets                          │ 4              │
├─────────────────────────────────┼────────────────┤
│ Locales                         │ 1              │
├─────────────────────────────────┼────────────────┤
│ Webhooks                        │ 0              │
├─────────────────────────────────┼────────────────┤
│ Tags                            │ 0              │
└─────────────────────────────────┴────────────────┘
At this point we can start developing the React components and page layout.
Step 3: The frontend
Dependencies
Some of the following libraries are not a must have for this solution, but they were very useful for me.
Ant Design of React
One of the libraries that gave me the most benefits is Ant Design of React. It is an enterprise-class UI design language and React UI library which gives us a set of high-quality React components out of the box with theme customization support. I don’t have much frontend development experience, but with Ant design I could highly accelerate the frontend build.
It is added to the project with the following dependency: Gatsby plugin to use Ant design.
To customize the theme, I defined my preferred values for Antd’s Less variables
For this I needed less-loader and gatsby-plugin-less which provides drop-in support for Less stylesheets.
Media query hooks
In some cases I followed a mobile first design where I display additional contents in larger viewports. For example, the mobile version of the calendar displays an icon in the date cells on event days, while in larger viewports I display the event title.
For this I use use-media-antd-query, an Antd compatible media query hooks.
Map (OpenStreetMap)
Leaflet is a popular javascript library for displaying mobile-friendly, interactive maps.
Use it with the Gatsby plugin but be sure wo wrap the Leaflet components in a check for window, otherwise the code will fail when Gatsby tries to build it for production.
Contentful extras
I found a React renderer for the Contentful rich text field type. It eliminates the need to write our own renderer which would require understanding the structure of of the rich text content node.
The calendar component
import { useStaticQuery, graphql } from 'gatsby'
In Gatsby there are 2 types of queries: page queries that are typically used in top-level components and are capable of handling variables because of their awareness of page context.
In contrast, static queries do not take variables and are typically used inside specific components lower in the component tree.
For this exercise I decided to try a static query inside the Calendar component. However, using a page (index) query capable of fetching only a subset of the events (e.g. the current month) might be more suitable. With static queries that is not possible because they are evaluated at build time and they do not accept parameters.
cmsEvents = useStaticQuery(eventsQuery);
The GraphQL query used for fetching the events:
export const eventsQuery = graphql`
  query EventsIndexQuery {
      allContentfulEvent {
        edges {
          node {
            id
            eventTitle
            eventDate
            eventDetails {
              json
              content {
                data {
                  target {
                    fields {
                      file {
                        en_GB {
                          url
                        }
                      }
                    }
                  }
                }
              }
            }
            location {
              lon
              lat
            }
          }
        }
      }
    }
`
In the default example project of Contentful, all contents are included twice in the response of the GraphQL queries. The reason is that a second language is configured in that project. This can be changed by removing the second language in Contentful or specifying the locale in the queries.
When running Gatsby in development mode, we can find GraphiQL on http://localhost:8000/___graphql. GraphiQL is a useful tool for discovering the GraphQL API and building/running queries.
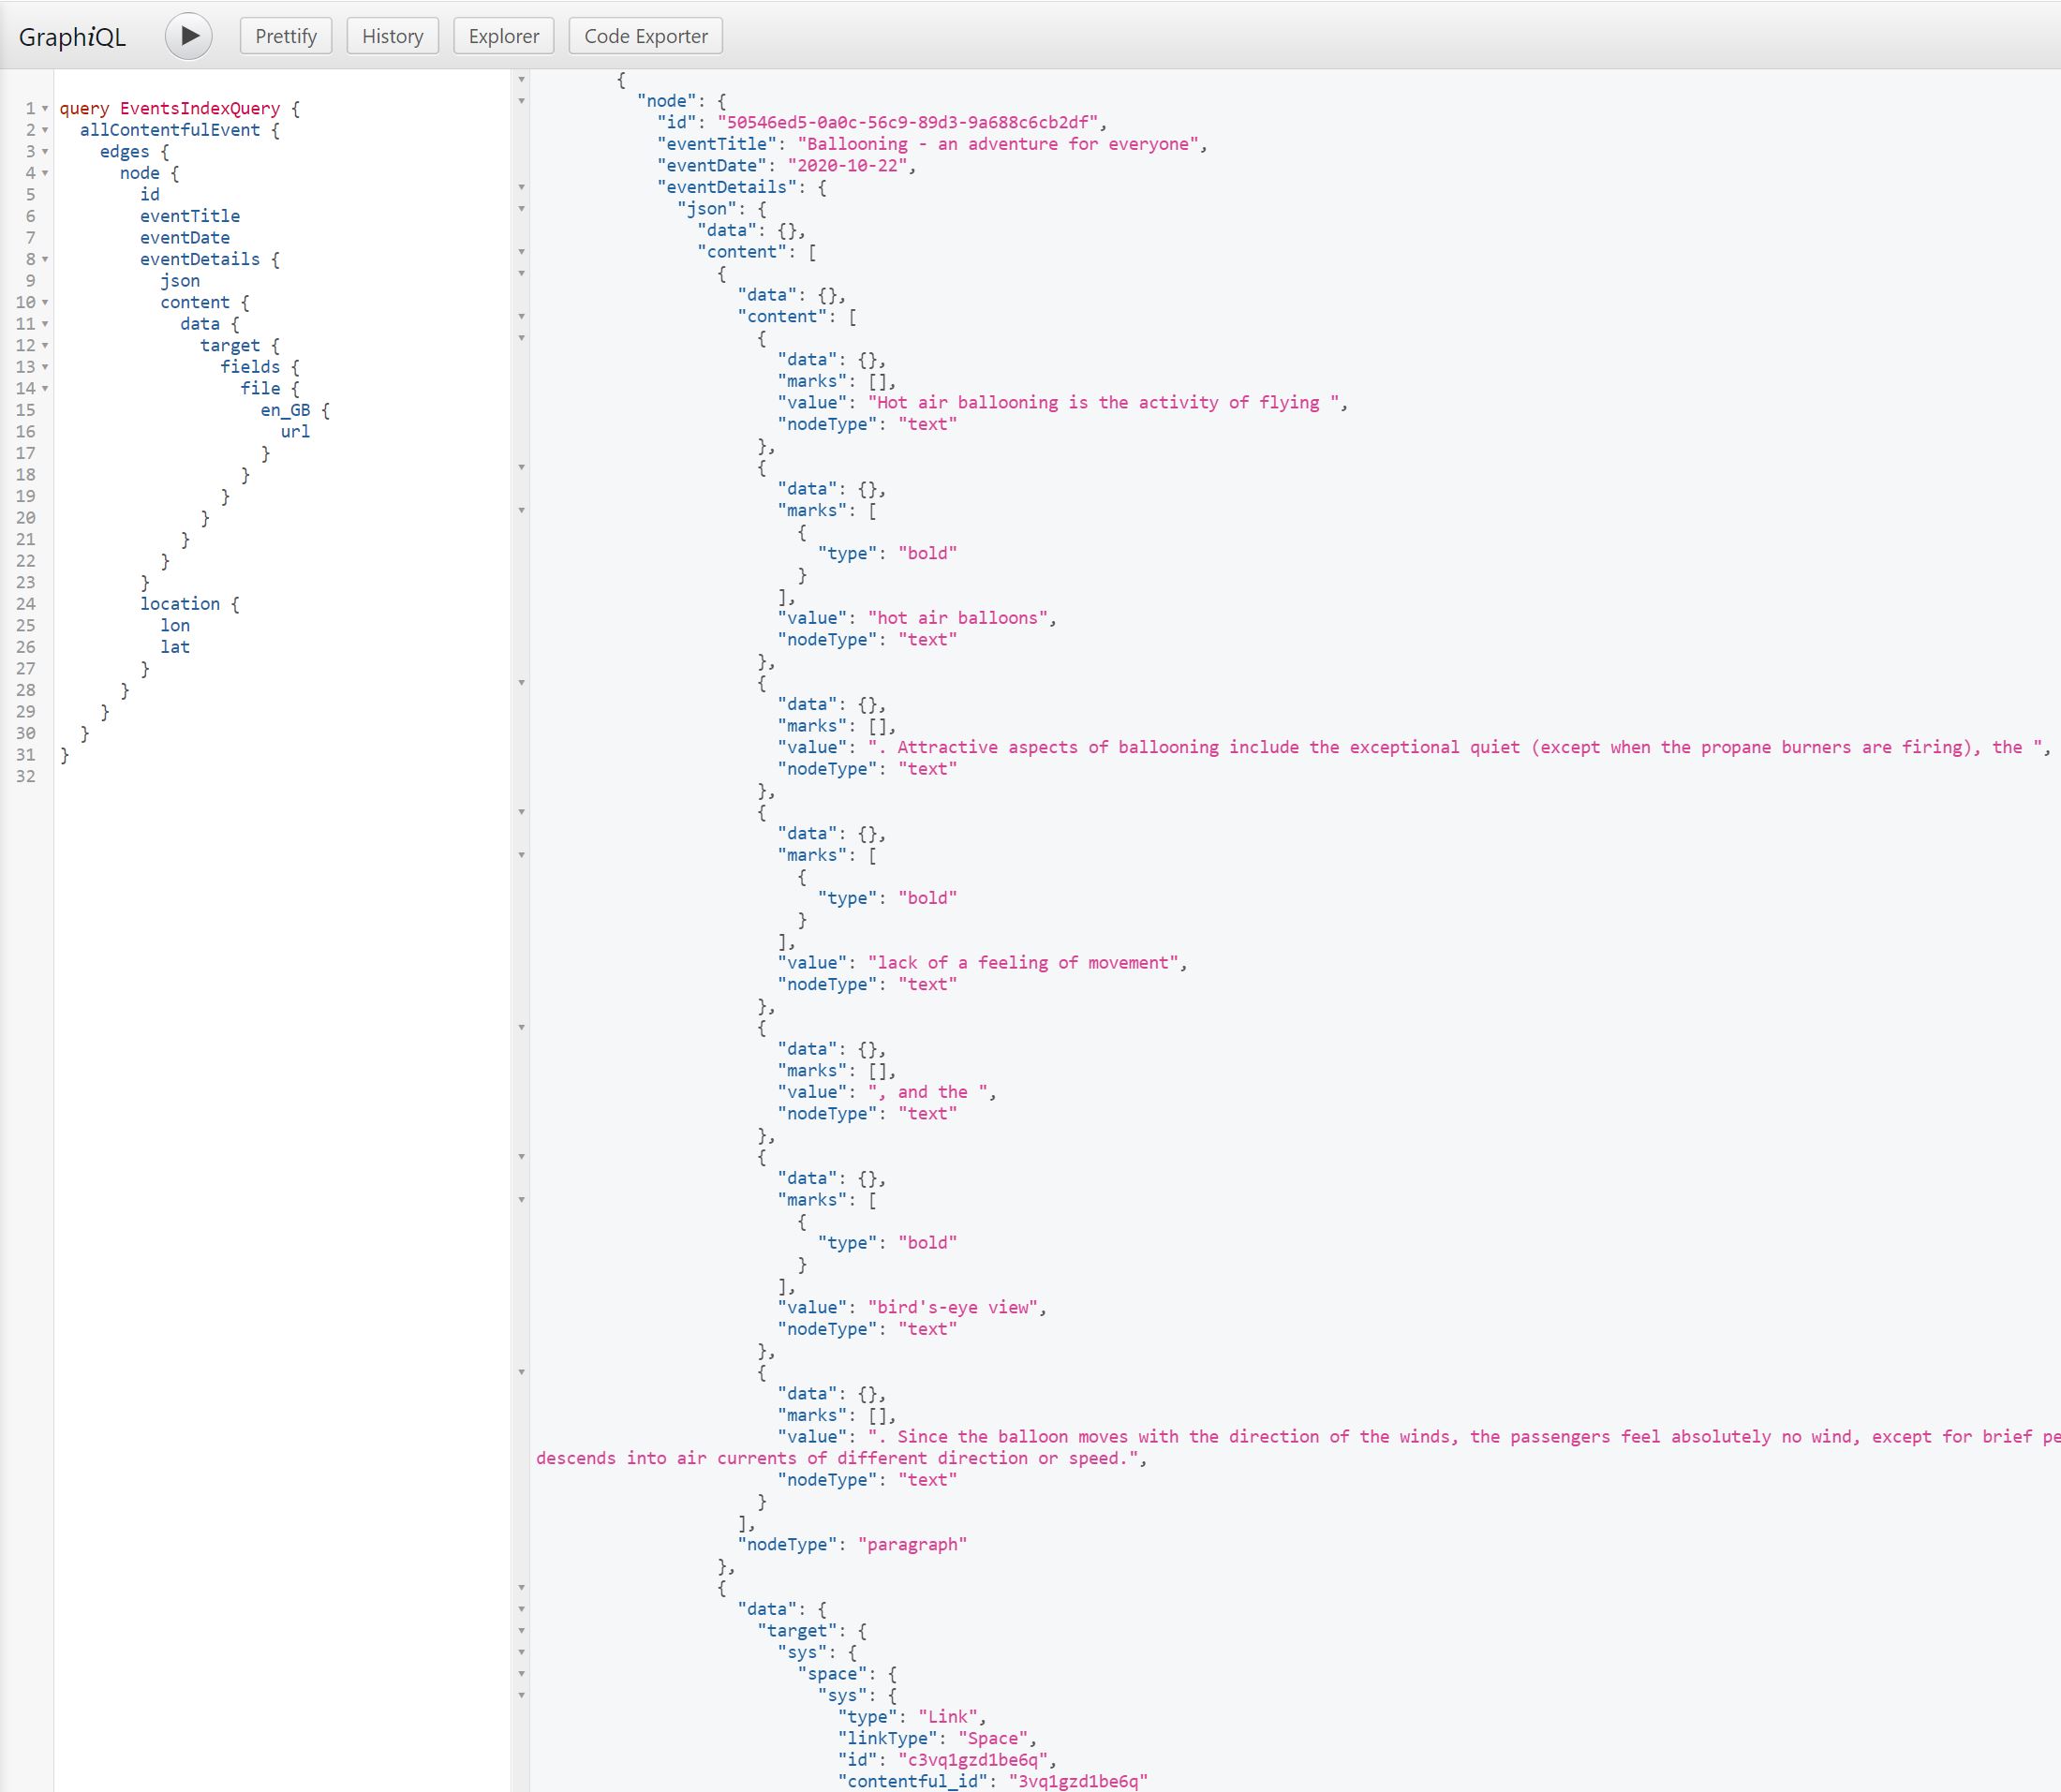
On the query result above we can see a specific section of an event: node.eventDetails.json. This is the JSON rendition of the rich text field that holds the event details.
Fortunately there is a React renderer for the Contentful rich text field type, which expects the JSON response and generates HTML.
Other than the above specifics, the component is a simple React component which return an Antd calendar instance.
In order to show an icon or a label on each day cell of the calendar that has an associated event in Contentful, we need to implement a dateCellRender() function.
  ...
  return (
   <div id="event-calendar">
      <Calendar style={{ fontSize: '14px' }} locale={props.lang == "hu_HU" && hu_HU} dateCellRender={(value) => dateCellRender(value, setVisible, setEventData, viewport)} />
      <Modal
        title={eventData.date}
        visible={visible}
        width={620}
        cancelButtonProps={{ style: { display: 'none' } }}
        okText={'Rendben'}
        onOk={() => handleOk(setVisible)}
        onCancel={() => handleOk(setVisible)}>
        <EventModal eventData={eventData} />
      </Modal>
    </div>
  )
...
The bigger section of the render code above is the display of an Antd Modal dialog.
This is displayed when someone clicks an event in the calendar.
function dateCellRender(value, setVisible, setEventData, viewport) {
  const listData = getListData(value);
  return (
    <ul style={{ paddingInlineStart: '0', listStyleType: 'none', fontSize: '12px', background: '#7DB46C' }}>
      {listData.map(item => (
        <li style={{ marginBottom: '5px' }} key={item.content}>
          <div style={{ marginRight: '10px', borderRadius: '0.25em' }} onClick={() => showModal(item, setVisible, setEventData)}>
            {(() => {
              switch (item.type) {
                case 'outdoor':
                  return <CompassOutlined />;
                case 'indoor':
                  return <TeamOutlined />;
                default:
                  return null;
              }
            })()}
            {(["md", "lg", "xl", "xxl"]).indexOf(viewport) > -1 && " " + item.content}
          </div>
        </li>
      ))}
    </ul>
  );
}
The modal window displays some of the event attributes and renders a map by taking the langitude/longitude received from Contentful.
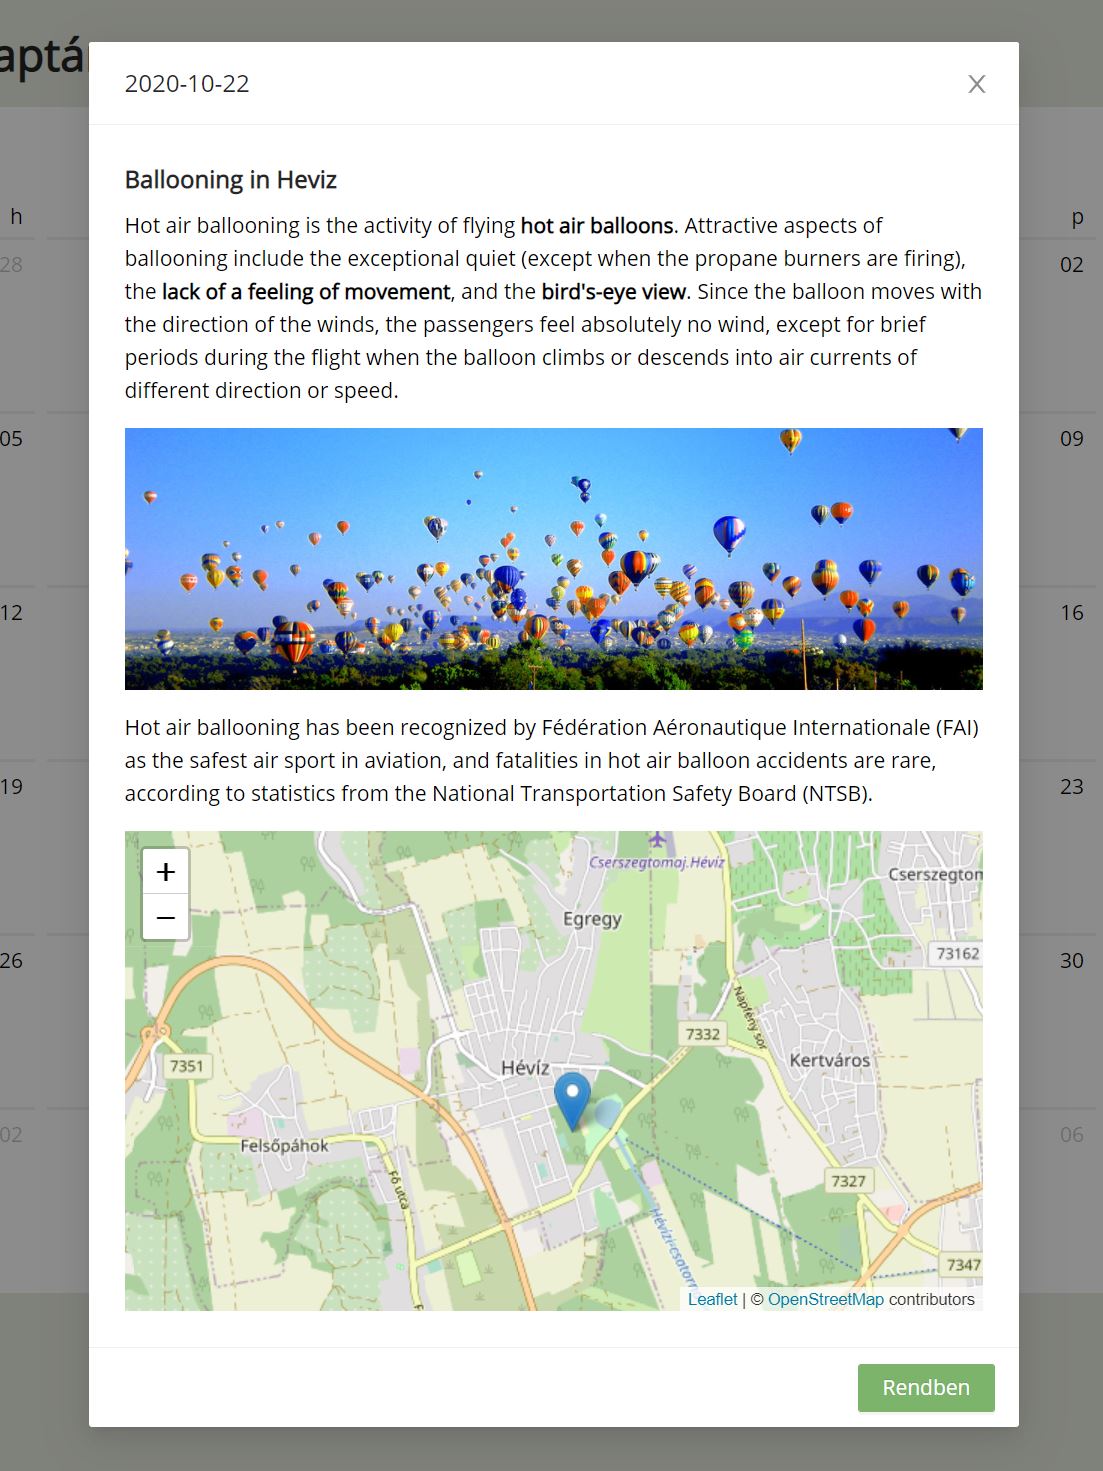
The implementation of the EventModal component is below.
import React, { useState } from "react";
import { documentToReactComponents } from '@contentful/rich-text-react-renderer';
import { Typography } from 'antd';
import { Map, Marker, Popup, TileLayer } from 'react-leaflet'
import 'leaflet/dist/leaflet.css';
import L from 'leaflet';
import icon from 'leaflet/dist/images/marker-icon.png';
import iconShadow from 'leaflet/dist/images/marker-shadow.png';
const { Title } = Typography;
let DefaultIcon = L.icon({
iconUrl: icon,
shadowUrl: iconShadow
});
L.Marker.prototype.options.icon = DefaultIcon;
const EventModal = ({ eventData }) => {
let cmsEventDetails = eventData.eventDetails.json;
let options = {
renderNode: {
'embedded-asset-block': (node) =>
<img style={{ width: '572px' }} src={node.data.target.fields.file['en-GB'].url} />
}
}
const position = [eventData.location.lat, eventData.location.lon];
return (
<div>
<Title level={5}>{eventData.title}</Title>
{documentToReactComponents(cmsEventDetails, options)}
<Map center={position} zoom={13} style={{height : '320px'}}>
<TileLayer
url="https://{s}.tile.openstreetmap.org/{z}/{x}/{y}.png"
attribution="© <a href="http://osm.org/copyright">OpenStreetMap</a> contributors"
/>
<Marker position={position}>
<Popup>{eventData.title}</Popup>
</Marker>
</Map>
</div>
);
}
export default EventModal;
The rest of the site is a standard React site (layouts, pages, etc.).
Deploying the website to the cloud
For this step, the production build of the site should be used.
To make a production build manually, use the following command.
npm run build
It fetches the content from Contentful and wraps it into a static website.
This can then be deployed to the cloud (S3, etc.)
App Engine Deployment
To deploy the site to GCP, a simple but powerful option is to use the App Engine.
For now, just the single events page will be served in the App Engine from the public folder.
For this, add the following script to the root folder of your project.
runtime: python37
service: default
handlers:
- url: /
  static_files: public/events/index.html
  upload: public/events/index.html
- url: /(.*)
  static_files: public/\1
  upload: public/(.*)
Although we are not using any Python capabilities, I choose the lightweight runtime provided for python as it looks suitable for the job.
It is recommended to prevent uploading a few files/folders by providing a .gcloudignore file.
# node & gatsby
.cache
node_modules
.env*
The site can be uploaded with the following gcloud command:
gcloud app deploy
Cloud build
If the App Engine deployment works, then lets automate the build/deplyoment.
The script below contains the following steps:
- Steps 1-3 use Google Secret Manager to get an SSH private key and clone the repository from Bitbucket (See Accessing private repositories).
- In steps 4-5 we install the NPM dependencies and run the static build using NPM. I was a bit lazy and just provided the Contentful access details in the environment, however they could be easily fetched from the Secret Manager like in Step 1.
- In step 6 the site is deployed to Google App Engine.
I put my cloudbuild.yaml file in a subfolder, because I found that the entire repository gets uploaded when the build is triggered from the console. It may not be a problem when it is used from the build trigger.
# Access the ssh key from Secret Manager
steps:
- name: gcr.io/cloud-builders/gcloud
  entrypoint: 'bash'
  args: [ '-c', 'gcloud secrets versions access latest --secret=YOUR_GIT_ACCESS_KEY > /root/.ssh/id_bitbucket' ]
  volumes:
  - name: 'ssh'
    path: /root/.ssh

# Set up git with key and domain
- name: 'gcr.io/cloud-builders/git'
  entrypoint: 'bash'
  args:
  - '-c'
  - |
    chmod 600 /root/.ssh/id_bitbucket
    cat <<EOF >/root/.ssh/config
    Hostname bitbucket.org
    IdentityFile /root/.ssh/id_bitbucket
    EOF
    ssh-keyscan -t rsa bitbucket.org >> /root/.ssh/known_hosts
    ssh-keyscan -t rsa contentful.com >> /root/.ssh/known_hosts
  volumes:
  - name: 'ssh'
    path: /root/.ssh

# Connect to the repository
- name: 'gcr.io/cloud-builders/git'
  args:
  - clone
  - --recurse-submodules
  - git@bitbucket.org:USERNAME/gatsby-contentful.git
  volumes:
  - name: 'ssh'
    path: /root/.ssh

- name: node
  entrypoint: npm
  dir: gatsby-contentful
  args: ['install']

- name: node
  entrypoint: npm
  dir: gatsby-contentful
  env:
    - CONTENTFUL_SPACE_ID=XXXXXXXX
    - CONTENTFUL_ACCESS_TOKEN=XXXXXXXX
  args: ['run', 'build']

- name: 'gcr.io/cloud-builders/gcloud'
  args: ['app', 'deploy']
  dir: gatsby-contentful
  timeout: '300s'
Step 4: Setup integration for previewing/publishing
For this step we need to setup a build trigger at Cloud Build, which triggers a site build on source code changes in Git.
To run the same build on content changes, too, we need to setup an integration between Contentful and GCP.
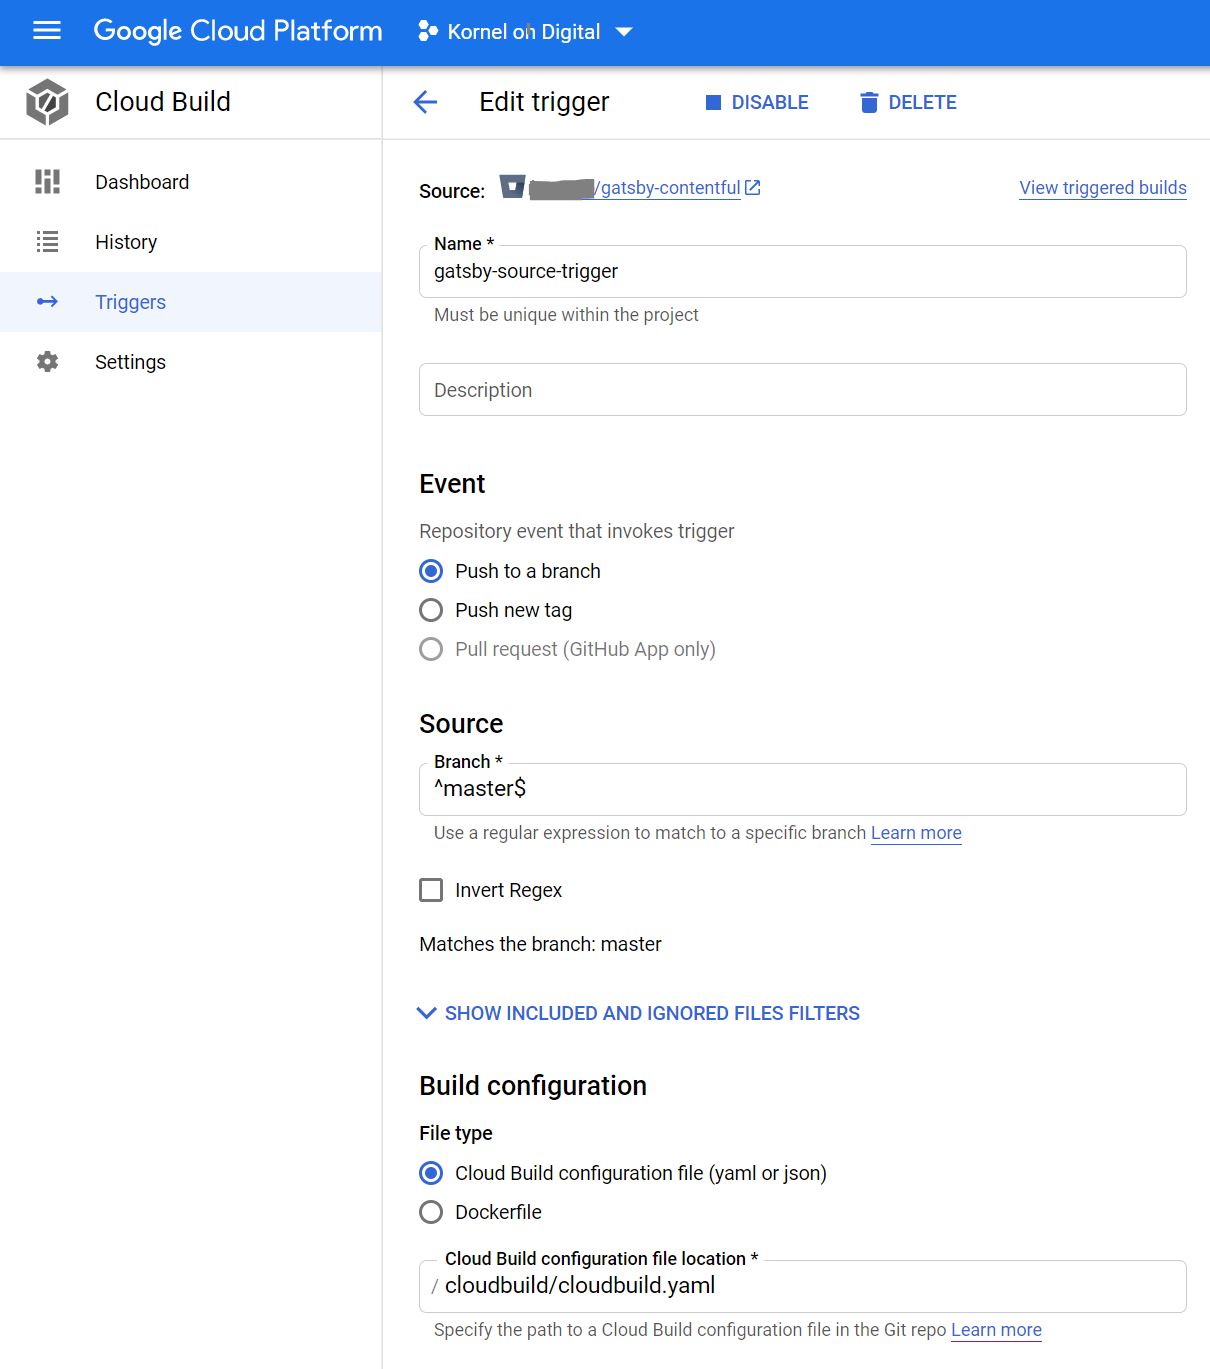
Build trigger
For this step a standard Git build trigger needs to be created which runs on pushing content to the master branch and uses the cloudbuild.yaml file created earlier.
Contentful webhook
Using Cloud Functions is a simple way for setting up a HTTP webhook. Below is a Python function I built for this purpose.
The function checks the presence of a Contentful specific header (x-contentful-topic) to make sure that it is a Contentful event. For production, higher security is necessary.
The function returns a 201 response in case of success, or HTTP 400/500 errors otherwise.
The function can be deployed with the default service account, which is capable of running Cloud builds. In that case we simply get the function’s access token from the environment and use it in the authorizazion header (done by the AuthorizedHttp instance).
The function requires the Cloud build trigger’s UUID stored in an environment variable.
import json
import logging
import os
from flask import abort
from google.auth.transport.urllib3 import AuthorizedHttp
from google.auth.compute_engine.credentials import Credentials

# the BUILD_TRIGGER_ID environment variable holds the UUID of the Cloud Build trigger
# the GCP_PROJECT environment variable is available in the execution environment by default
CLOUD_BUILD_TRIGGERS_API = f"https://cloudbuild.googleapis.com/v1/projects/{os.environ.get('GCP_PROJECT')}/triggers/{os.environ.get('BUILD_TRIGGER_ID')}"

def build_trigger():
    try:
        # we get the default service account's oauth2 access token from the compute metadata endpoint with scope required for Cloud Build
        credential = Credentials(scopes = ["https://www.googleapis.com/auth/cloud-platform"])
        auth_http = AuthorizedHttp(credentials=credential)

        # Cloud build won't run without the branchName specified... all other source settings are stored in the trigger already
        request_body = json.dumps({ "branchName": "master" })
        response = auth_http.request("POST", f"{CLOUD_BUILD_TRIGGERS_API}:run", body = request_body)
        logging.info(f"Response status: {response.status}")

        if response.status < 200 or response.status >= 300:
            logging.error(f"Failed to trigger cloud build. Response data: {response.data}")
            abort(500)
        else:
            response_json = json.loads(response.data.decode())
            logging.info(response_json)

    except Exception as e:
        logging.exception("Exception while triggering cloud build")
        abort(500)


def handler(request):
    """
    Responds to HTTP events.

    :param request: The request object.
    :return: HTTP 201 response in case of success, 400 or 500 error response otherwise
    """
    request_json = request.get_json()
    # simple validation by verifying the presence of a Contentful specific header... we won't trigger the build otherwise
    if ('x-contentful-topic' in request.headers):
        build_trigger()
        return '', 201
    else:
        abort(400)
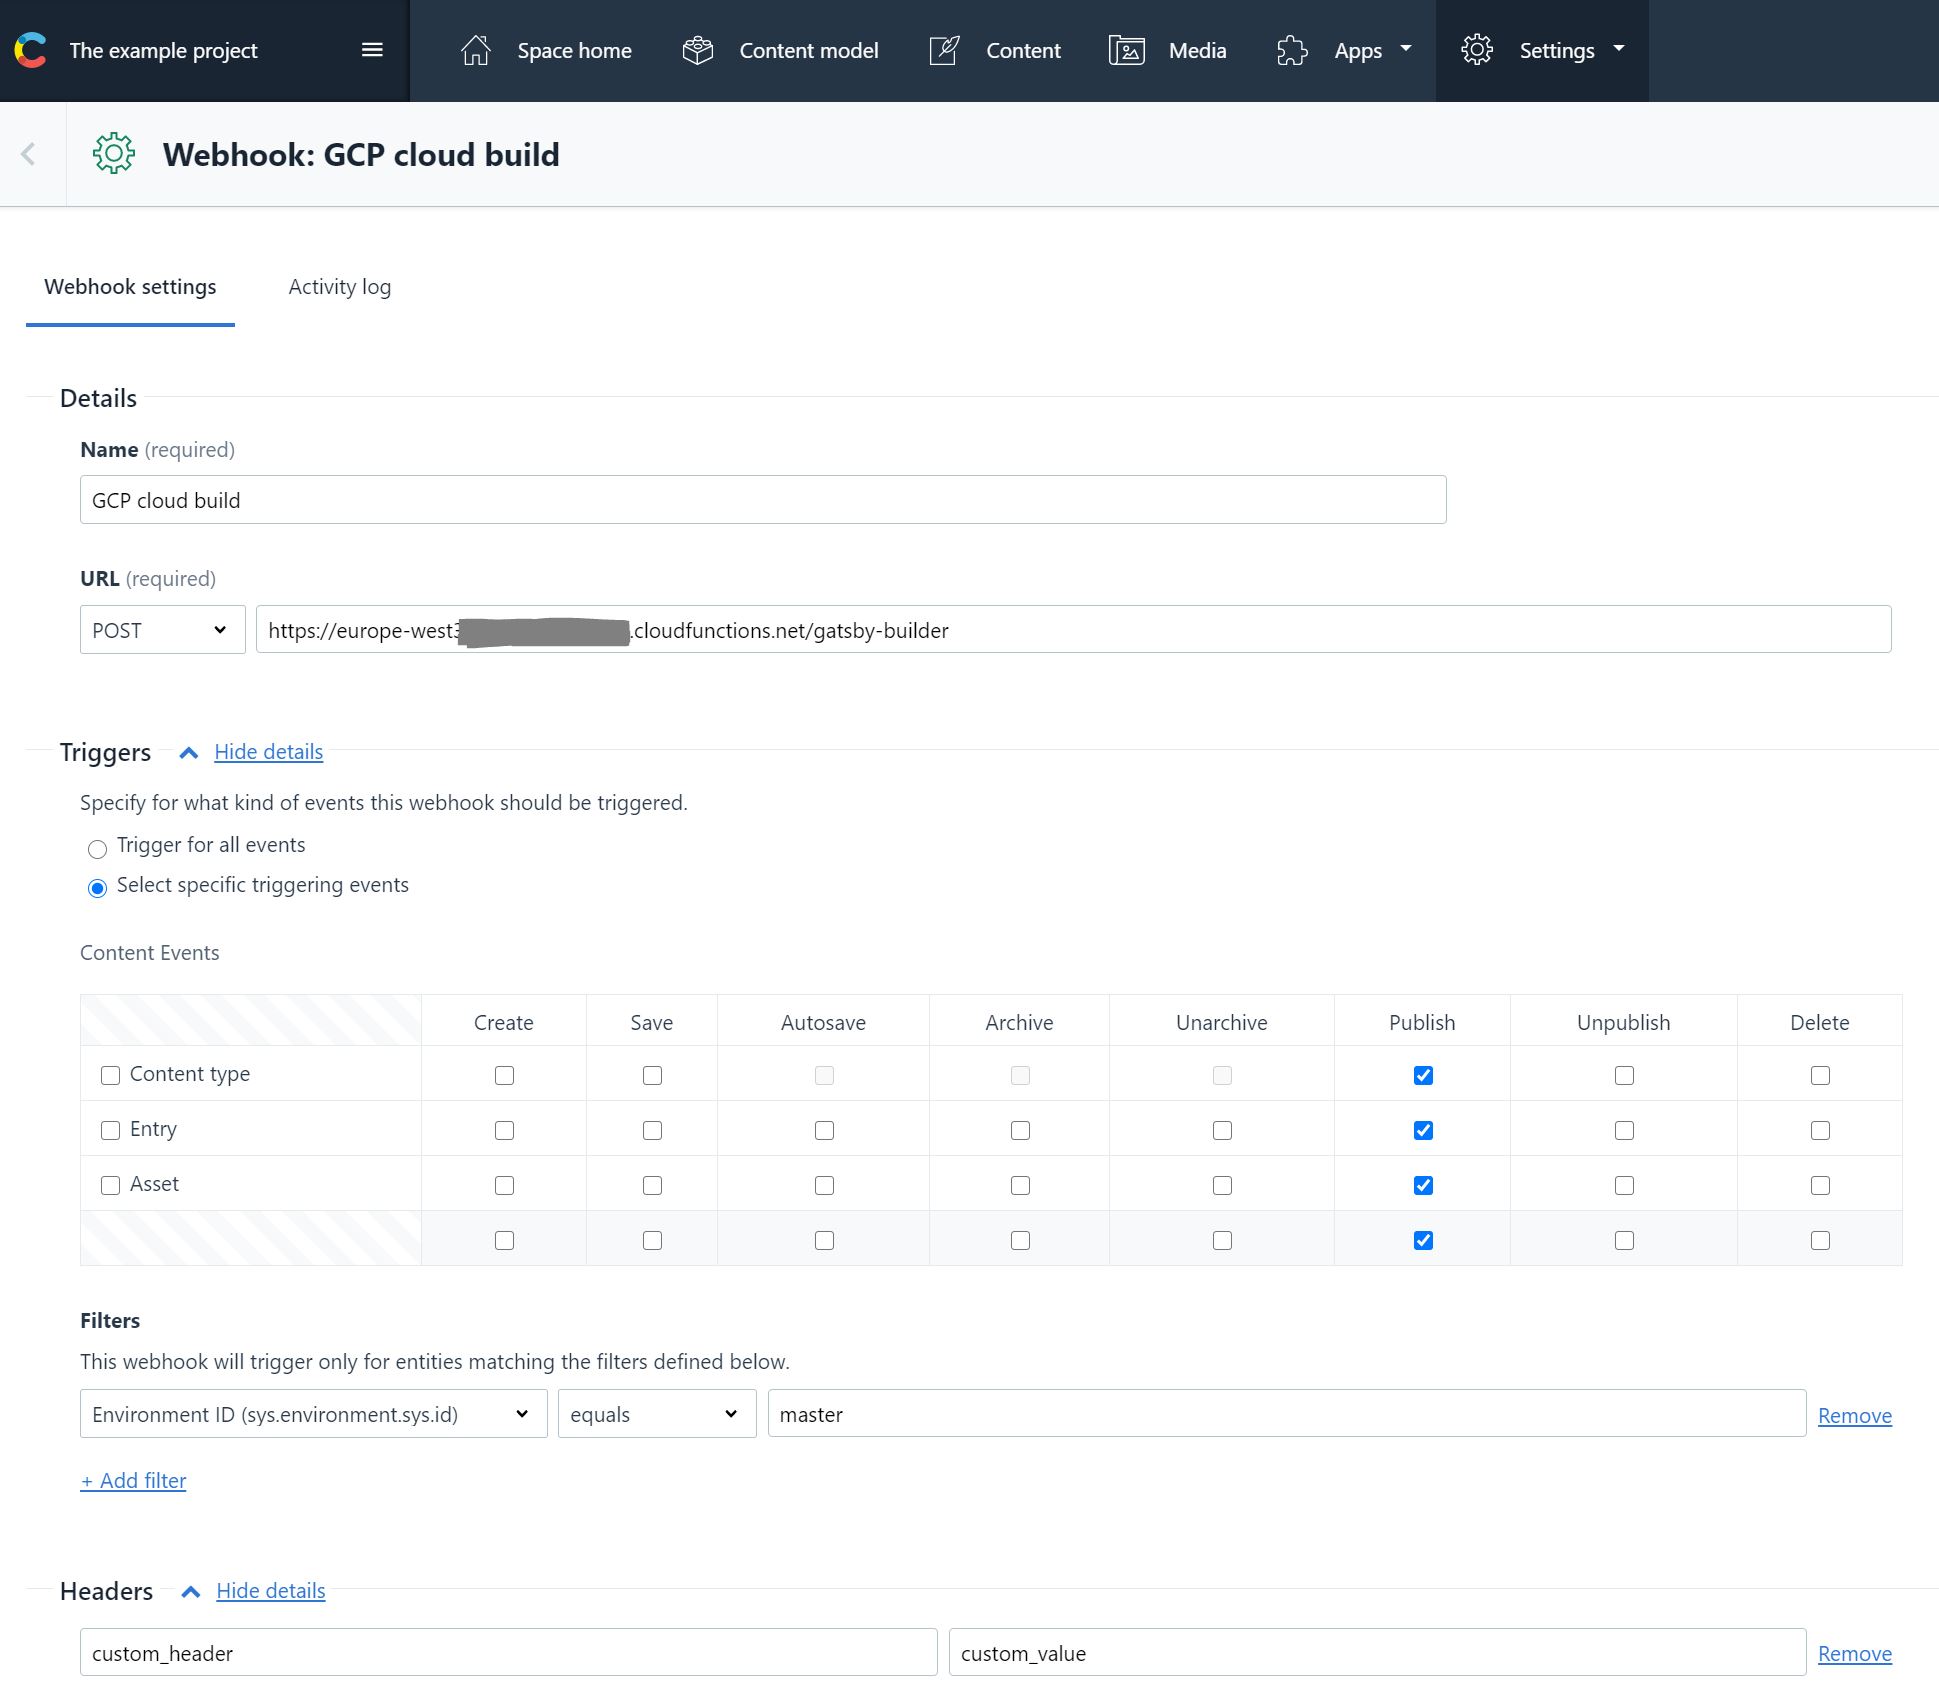
The last step is to configure the webhook’s URL at Contentful.
If it is all successful, then the web site appears on a public URL a couple of mins after code or content changes.
As a final note, I hope that this post highlighted some of the benefits of using this technology stack for static websites.
For more detailed explanations or code samples for each step please contact me in comment or using the contact page.