Event based integrations via Adobe I/O give us endless opportunities for integrating Adobe products with each other or with external services. In the recent past I’ve built several prototypes for my own education and I would like to present one of them for you.
In this post I’m going to present a solution that can be used for notifying visitors of your web site using web push if new AEM content (page) is published.
- The web site is hosted on Adobe Experience Manager (AEM)
- I’m going to use Adobe I/O Events in order to decouple the solution from the web site
- The event is processed outside of the Adobe Experience Cloud, using a webhook built with AWS API Gateway, backed by AWS Lambda functions.
- The backend is built in node.js and hosted on AWS
- I’m using Firebase Cloud Messaging for delivering web notifications
Remark: since I don’t have access to an AEM based, published web site on the Internet, I’m going to setup a simple static website on Amazon S3 to simulate the web based Firebase notifications.
Thanks to the messaging technology chosen (Firebase Cloud Messaging – web push), the user doesn’t have to be on the web site at the time of the event in order to receive the notification. A service worker, registered in the browser and running in the background takes care of displaying the notification on the console if the web page is not loaded at the time of delivering the notification.

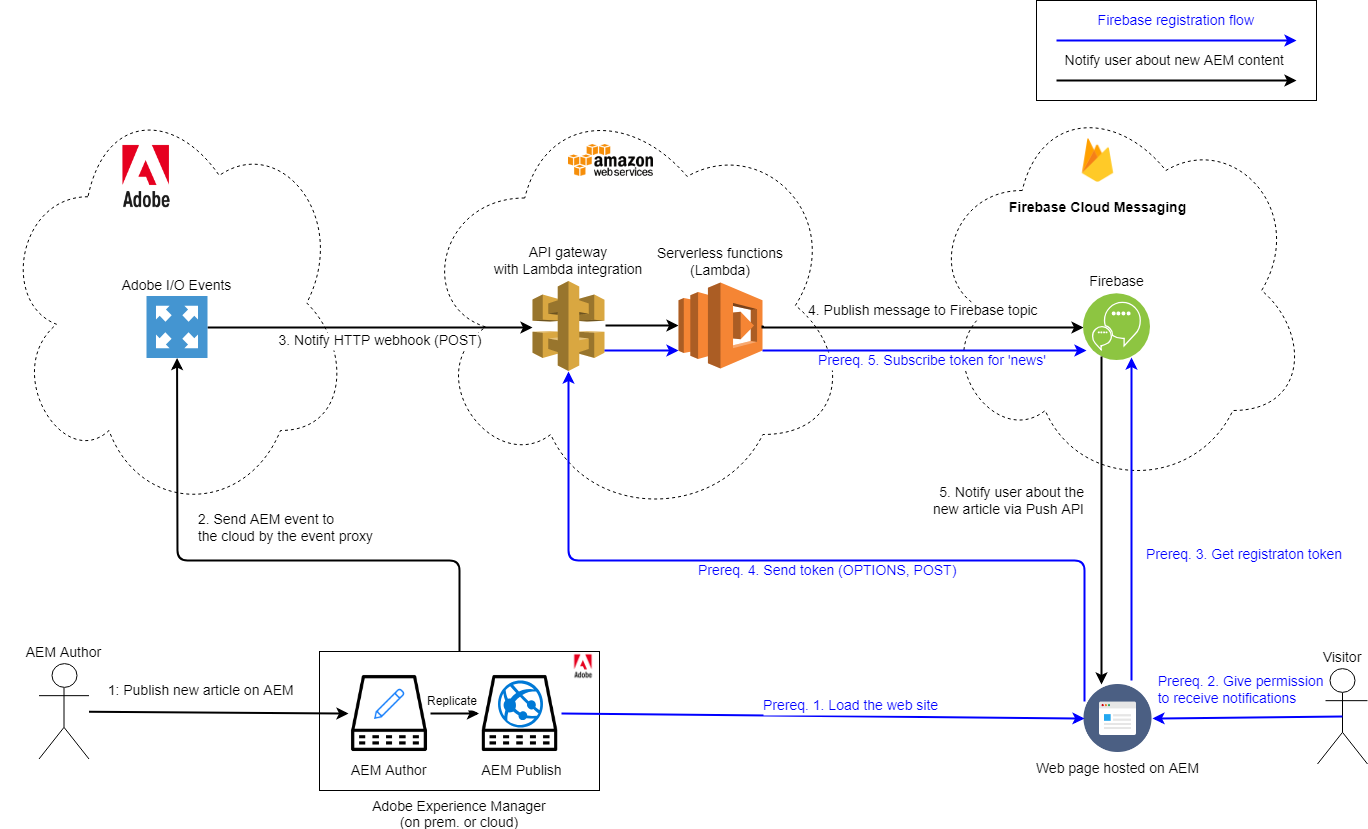
The diagram below shows the high level solution, from end to end:
I’ve put 2 data flows into the diagram:
- In order to send notifications to a user, she/he has to download our web page (1./) and confirm (2./) that she/he wants to receive notifications from us. Upon confirming this, a token is retrieved (3./) from Firebase and sent to our API (4./) to subscribe the token (5./) to the ‘news’ messaging topic.
- Subscribing a user token to a Firebase topic is done using the Firebase Admin SDK. This code uses secrets that needs to be hidden from the public, therefore it is done in the AWS backend part of the solution.
- As soon as new content is published (1./) in AEM, the event will be dispatched (2./) to the Adobe I/O cloud, which is then posted (3./) to our API (webhook). We then send a notification to the ‘news’ messaging topic (4./) and everybody who is subscribed receives the notification (5./), which can be one of the following:
- If the user is on the web page at the time of receiving the notification, then we can display the notification on the page directly, e.g. in a banner on the top of the screen.
- If the user has navigated away from the page, then the browser displays a notification on the desktop.
The solution might look a bit over-complicated, but this setup has several advantages:
- It is serverless
- Any code needed can be deployed to AWS Lambda or injected into the web site via dynamic tagging
- It is decoupled from the web site and abstracted in many ways
- No business logic is hard coded into the web site or the CMS server’s backend.
- It is possible to turn this solution on or off without having make a new release of the website (e.g. use dynamic tagging to inject the Firebase code into the site)
- It is highly scalable
- The components used were built to handle any number of events/requests/invocations without having to worry about the infrastructure
There is a lot of variability in this solution. For example AWS is replaceable with any other platform that can host a standard webhook + serverless function like Heroku, Apache Openwhisk, Adobe IO Runtime (coming soon). Firebase Cloud messaging is also replaceable with other notification platform.
Parts of the solution can be reused in integration with other platforms. For example, the webhook used for receiving the event and delivering the notification could be adjusted to work with other CMS.
The backend
Lets zoom in on the AWS part of the solution first.
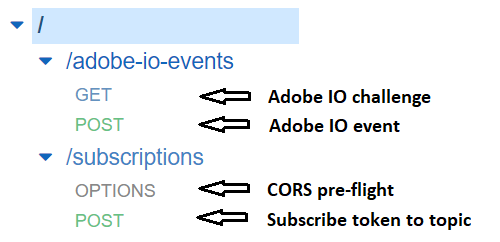
We need an API that provides the following features:
- It acts as a HTTP webhook for receiving events from Adobe IO
- GET method: a MOCK integration that is able to accept and reply to a challenge HTTP request parameter sent by Adobe I/O. This is used by Adobe I/O to verify that the webhook is alive
- POST method: a Lambda proxy integration for authenticating and processing events from Adobe I/O.
- An endpoint for subscribing Firebase user tokens to a messaging topic
- OPTIONS method: since I didn’t put the API and the web site behind the same domain, browsers would prevent us from sending a POST requests to the API endpoint unless we implement support for the OPTIONS method so that browsers can perform a preflight request. This method is backed by a MOCK integration and was added by AWS after enabling CORS on the resource.
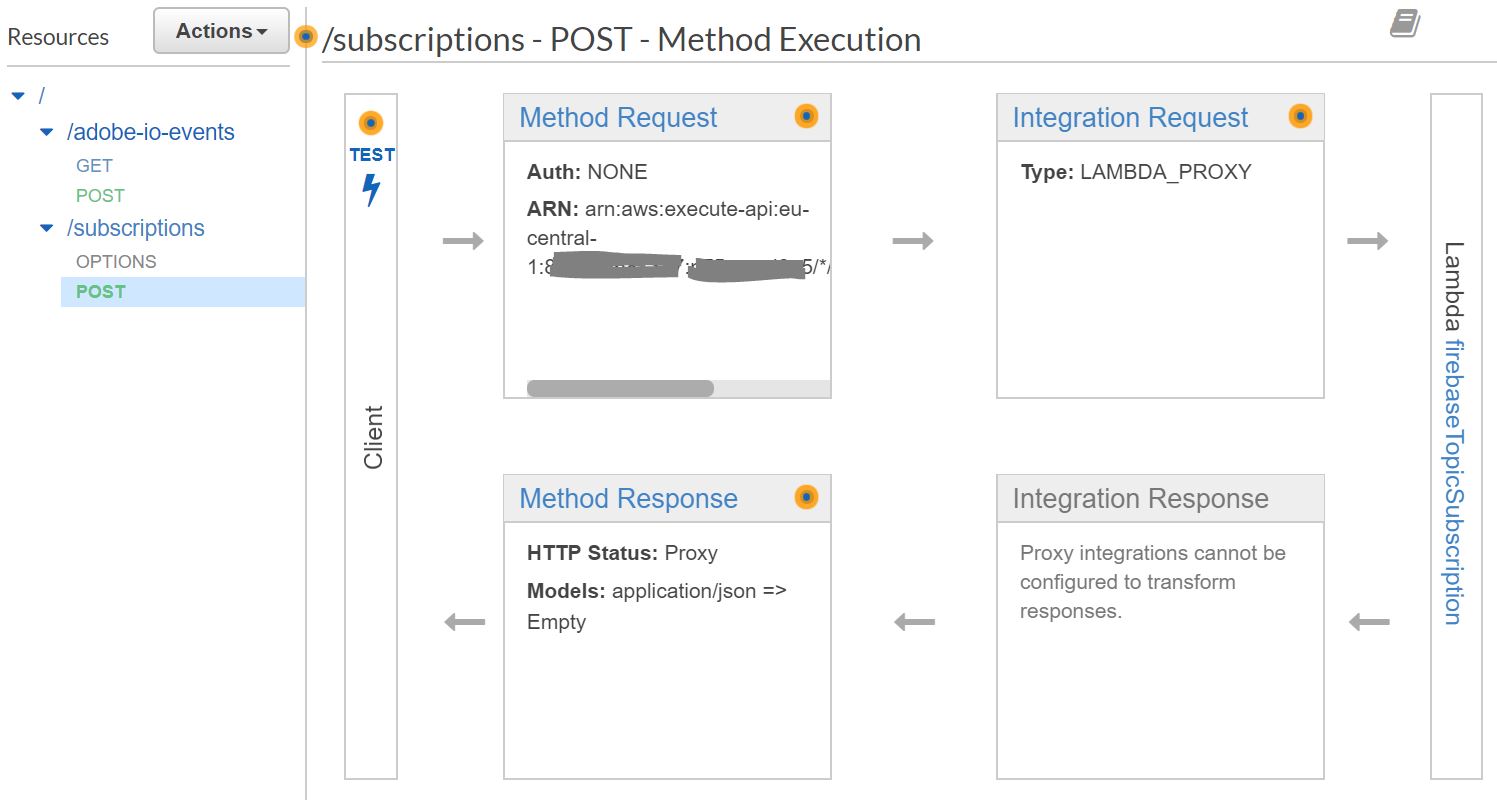
- POST: a Lambda proxy integration for subscribing a Firebase user token to a messaging topic. This endpoint will be called from the web page right after retrieving a Firebase token.
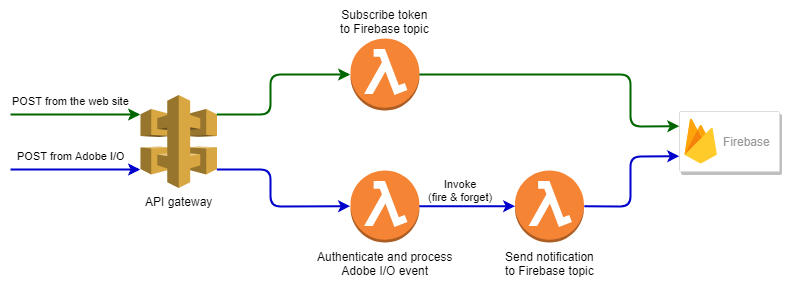
For implementing the API above we need two AWS Lambda functions that would act as Lambda proxies behind the POST methods. To keep the functions small and minimize their responsibilities, I’ve added the Firebase notification logic into a 3rd Lambda function, which is invoked by another Lambda function in a fire & forget manner directly.
A solution like this can be hosted for free in the free tier of AWS until the traffic remains low.
If you want to familiarize yourself with the concept of delivering events to webhooks, read Adobe’s Introduction to Webhooks.
Let’s build the prototype!
Part 1: Dispatch AEM page events to Adobe I/O
There exists native integration between AEM events and Adobe I/O Events beginning from AEM 6.2+.
In my prototype I used AEM 6.4 GA. Note, that the integration got broken as soon as I installed AEM 6.4 SP1 (AEM 6.4.1), so I skipped the service pack and left it for investigation later.
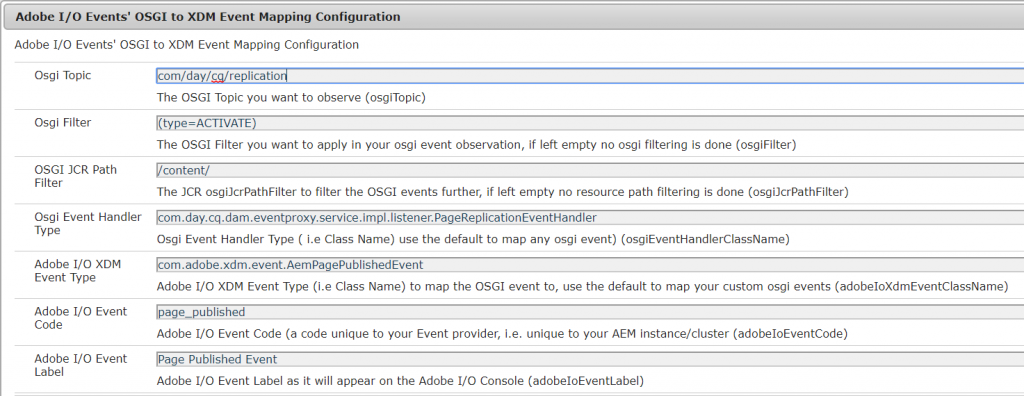
The Adobe I/O integration for AEM events works by dispatching events, published to OSGi topics, into the selected Adobe I/O workspace. The OSGi topic can be an OOB topic or a custom one. The following events are supported natively:
- DAM asset created/updated/deleted
- AEM page published/unpublished
- Custom events published to your OSGi topics
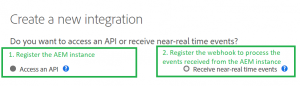
The main preparation activity is the setup of the integration between AEM and Adobe I/O. If you follow Adobe’s documentation, they will suggest that you need to create two integrations on the Adobe I/O Console. The same might work in just one integration, too, but for now lets go with separate integrations for the different usage types.
- The first integration is an Access an API -type integration. This is needed by AEM to register the event proxy on Adobe I/O, so that it can be used in the other Adobe I/O integration.
- The second integration is for receiving near real-time events from the AEM instance registered in the first integration.
I won’t describe the steps here because it has been described by others with more details already, and the steps on this page are clear and easy to follow. Do not forget to configure the link externalizer in AEM author, otherwise you won’t be able to recognize your AEM instance as the event provider on Adobe I/O while adding the event registration to the second integration.
We will come back to the second integration later after we will have our webhook available on the Internet.
Enabling the AEM event proxy functionality goes via the Felix console. The DAM/Page events listed above are setup by default.
Part 2: Build a HTTP webhook on AWS API Gateway with AWS Lambda integration
The webhook consists of 2 parts:
- The challenge request (HTTP GET)
- The event receiver (HTTP POST)
The Challenge request
For the challenge request it is possible to setup a GET method execution with Mock integration type on the AWS API Gateway.
- Step 1: Method Request
- Add a single query string parameter (‘challenge’) and mark as required.
- Step 2: Integration Request
- Select ‘Mock’
- Step 3: Integration Response
- Setup a response with HTTP 200 and Content-Type: application/json
- To return a JSON response with the challenge value received in query string parameter, add the following code to the Mapping Template
#set($inputRoot = $input.path('$'))
{
"challenge" : "$input.params('challenge')"
}
- Step 4: Deploy your API to a new stage (e.g. ‘dev’) and capture the endpoint URL from the stage
You can test your endpoint by sending a GET request and checking the response:
On a GET request to https://XXXXX.execute-api.eu-central-1.amazonaws.com/dev?challenge=123, you should receive the following response:
{
  "challenge" : "123"
}
The event processor Lambda function
Our processor function has to address at least the following responsibilities:
- We have to authenticate the received requests to ensure that they were sent by Adobe I/O Events
- The function will publish the AEM page event to Firebase Cloud Messaging
When the webhook is called, Adobe I/O Events will add the x-adobe-signature header to each POST request. The value of this header is the SHA256 HMAC of the JSON payload computed using your client secret as the secret key, and then turned into a Base64 digest.
To build the authentication code, get your client secret in the Overview tab of your integration on Adobe I/O first and add it as an environment variable for your Lambda function.
After successful authentication of the event, the function collects some event attributes (path of the AEM content published) and invokes the “firebasePublishToTopic” Lambda function (to be built in the next step) in a fire & forget manner.
Here is a sample code for this function written in node.js:
var request = require('request');
var crypto = require('crypto');
var AWS = require('aws-sdk');
var lambda = new AWS.Lambda();
var secret = process.env.secret;

var authenticateAdobeRequest = function (signature, body) {
  const hmac = crypto.createHmac('sha256', secret);
  hmac.update(body);
  return (signature == hmac.digest('base64'));
}

exports.handler = function (event, context, callback) {
  console.log('request: ' + JSON.stringify(event));
  if (event.body && event.headers && authenticateAdobeRequest(event.headers['X-Adobe-Signature'], event.body)) {
    let body = JSON.parse(event.body);
    if (body.event['xdmEventEnvelope:objectType'] == 'xdmComponentizedPage') {
      var payload = {
        title: 'New content was published!',
        message: body.event['activitystreams:generator']['xdmContentRepository:root'] + body.event['activitystreams:object']['xdmComponentizedPage:path']
      };
      var params = {
        FunctionName: 'firebasePublishToTopic',
        InvocationType: 'Event',
        LogType: 'Tail',
        Payload: JSON.stringify(payload)
      };
      lambda.invoke(params, function (error, data) {
        if (!error) {
          var resBody = { 'status': 'processing' };
          callback(null, { 'isBase64Encoded': false, 'statusCode': 200, 'headers': {}, 'body': JSON.stringify(resBody) });
        } else {
          console.log(error);
          callback(error);
        }
      });
    } else {
      console.log('Lambda invocation ignored.');
      var resBody = { 'status': 'ignored' };
      callback(null, { 'isBase64Encoded': false, 'statusCode': 200, 'headers': {}, 'body': JSON.stringify(resBody) });
    }
  } else { // failed to authenticate
    console.log('Authentication failed.');
    callback(null, { 'isBase64Encoded': false, 'statusCode': 403, 'headers': {}, 'body': 'Authentication failed!' });
  }
}
The function invokes another AWS Lambda function for delivering the event notification via Firebase. That function is described later in this post.
The event processor API endpoint backed by the AWS Lambda function
Go to the resources section of your API and create a POST method. Choose Lambda Function as the integration type of your new method.
Select “Lambda Proxy integration” type and choose the newly created Lambda function for the integration point of your new POST method. Let AWS update the API’s permissions to invoke the Lambda function.
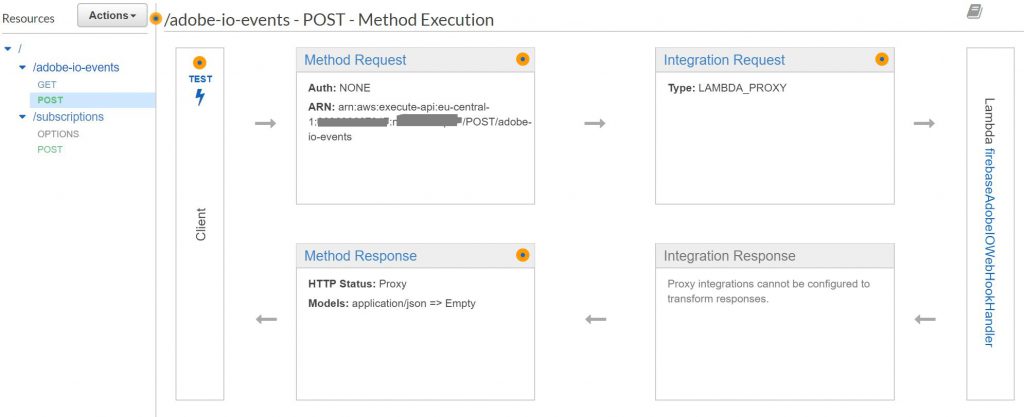
Deploy your API to the ‘dev’ stage.
Part 3: Add Firebase Cloud Messaging to your web application
I recommend deploying the Firebase code (or parts of it) into the web site using a dynamic tagging tool (e.g. DTM or Launch). I wanted to keep this post simple, therefore I will use a simple static web site to demonstrate the steps of integrating Firebase. If you still want to setup Launch for your AEM site, you can find several tutorials that will guide you through the steps needed. Check for example this guide from Adobe.
In order to make the integration working, you need to host your web site on HTTPS. For this tutorial I’ve setup a static website on Amazon S3 and cached it with Cloudfront. By default, a static website on S3 is served via HTTP (although individual objects are available on HTTPS). By caching the website on Cloudfront, you will get an URL for your site on HTTPS.
The test site is very basic, it consists of an index.html page, a Javascript file that contains the Firebase initialization code, and a service worker that is responsible for receiving the notification when the web site is not loaded at the time of the event.
Register on Firebase
Navigate to the Firebase console and logic using your Google account.
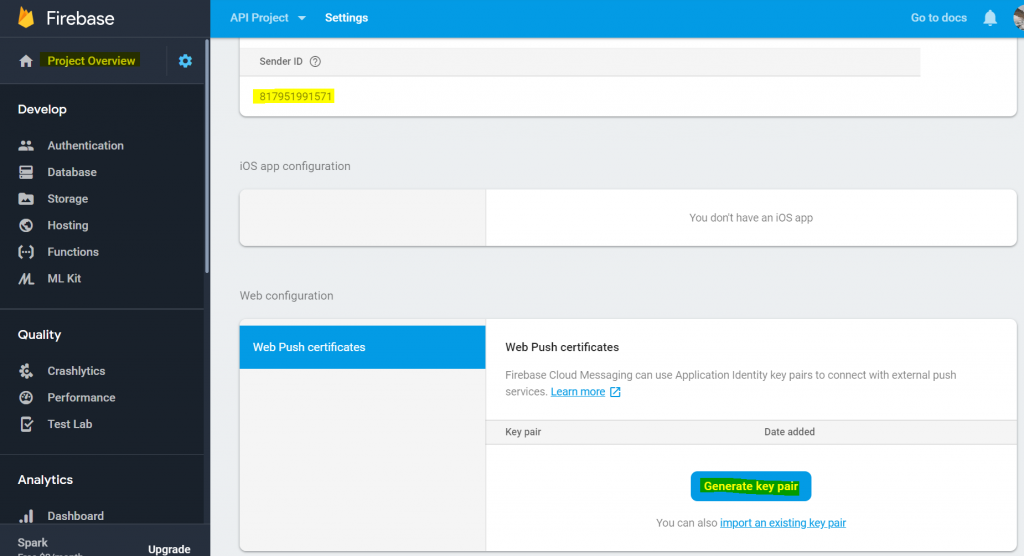
Add a new project and then navigate to Project overview -> Project settings. Open the Cloud messaging tab and collect the following details:
- Your Sender ID.
- It will be needed in the notification receiver (the static web site)
- Generate an application identity key pair.
- It can be used for authenticating ourselves from applications that send notifications from outside of Firebase.
Create a static website on Amazon S3
I’ve built a simple demo site that has the following structure:
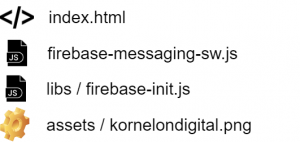
The index.html is really simple:
<html>
<title>Firebase Messaging Demo</title>
  <style>
    div {
        margin-bottom: 15px;
    }
  </style>

  <body>
    <div id="token_div">
        <p id="token" style="word-break: break-all;"></p>
    </div>
    <div id="permission_div">PERMISSION NEEDED!</div>
    <div id="messages"></div>
    <script src="https://www.gstatic.com/firebasejs/5.5.9/firebase.js"></script>
    <script src="https://www.gstatic.com/firebasejs/5.5.9/firebase-app.js"></script>
    <script src="https://www.gstatic.com/firebasejs/5.5.9/firebase-messaging.js"></script>
    <script src="./lib/firebase-init.js"></script>
  </body>
</html>
The following code snippet is responsible for allocating a firebase token and sending it to our backend. I’ve truncated the snippet but you can build yours based on the Firebase cloud messaging quickstart.
// Initialize Firebase
var config = {
	messagingSenderId: "YOURSENDERID"
};
firebase.initializeApp(config);
console.log(firebase.app().name);

const messaging = firebase.messaging();

navigator.serviceWorker.register('./firebase-messaging-sw.js')
	.then(function (registration) {
		messaging.useServiceWorker(registration);
	});

messaging.requestPermission().then(function () {
	console.log('Notification permission granted.');
	// Get token. Make a network call or retrieve from local cache.
	messaging.getToken().then(function (currentToken) {
		if (currentToken) {
			sendTokenToServer(currentToken);
			updateUIForPushEnabled(currentToken);
			console.log(currentToken);
		} else {
			// Show permission request.
			console.log('No Instance ID token available. Request permission to generate one.');
			// Show permission UI.
			updateUIForPushPermissionRequired();
			setTokenSentToServer(false);
		}
	}).catch(function (err) {
...
	});
}).catch(function (err) {
...
});

function sendTokenToServer(currentToken) {
	if (!isTokenSentToServer()) {
		console.log('Sending token to server...');
		subscribeForNews(currentToken);
		setTokenSentToServer(true);
	} else {
		console.log('Token already sent to server');
	}
}

function subscribeForNews(currentToken) {
	const postBody = {
		token: currentToken
	}
	const params = {
		headers: {
			'content-type': 'application/json; charset=UTF-8'
		},
		body: JSON.stringify(postBody),
		method: 'POST'
	}
	fetch(firebaseSubscribeUrl, params).then(data => { console.log(data) }).catch(error => console.log(error));
}
Make the website available on HTTPS:
- Create an S3 bucket on AWS.
- Upload your files into the bucket.
- Create a Cloudfront distribution and set the S3 bucket as its origin. Allow Cloudfront to update the bucket policy of the S3 bucket so that the site will be accessible via Cloudfront only. This is useful if you don’t want to make the bucket public.
Find the public domain name of your site in the Cloudfront distribution and load the index.html. You should see something like this:
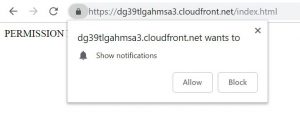
Upon clicking on Allow, the token allocated on Firebase will be displayed.
Testing Firebase messaging
You can test the message delivery by using e.g. CURL.
Firebase supports 2 types of authorization methods. In the
– The FCM HTTP v1 API uses a short-lived OAuth 2.0 access token generated for a service account associated with your Firebase project. We will use this method in our backend.
– The legacy protocols use long-lived API keys retrieved from the Firebase console. The sample POST request below uses the legacy protocol and long lived legacy auth key.
#!/bin/bash curl -X POST -H "Authorization: key=YOUR_LEGACY_AUTH_KEY" -H "Content-Type: application/json" -d '{ "data": { "notification": { "title": "FCM Message", "body": "This is an FCM Message", "icon": "/kornelondigital.png", } }, "to": "YOUR_TOKEN_FROM_THE_WEB_SITE" }' https://fcm.googleapis.com/fcm/send
Collect your legacy auth key from Firebase and the messaging token from the web site and issue the request above.
Part 4: Subscribe the Firebase token to the messaging topic
With Firebase we can deliver messages to individual users (tokens) or to subscribers of a topic. We will do the latter. As soon as a visitor confirms that she/he wants to receive notifications from our web site, a token will be created and sent to our backend to subscribe on a messaging topic (‘news’)
Subscribing a token to a topic is done through the REST API of Firebase and requires the use of the server key. Since having the server key allows sending messages on your app’s behalf to all of your app’s users, it has to be done securely from the backend.
For this, I’ve implemented an API POST endpoint with Lambda proxy integration that executes the following code. The service-account.json file can be downloaded from your Firebase project and contains the credentials needed to access the Firebase REST API.
The function expects a simple JSON event containing the token to be subscribed.
var admin = require('firebase-admin');
var serviceAccount = require('./service-account.json');
const topic = 'news';

exports.handler = function (event, context, callback) {
  if (event.headers !== null && event.headers !== undefined) {
    console.log(event.headers['Referer']);
  }
  if (event.body) {
    let body = JSON.parse(event.body);
    if (body.token) {
      admin.initializeApp({
        credential: admin.credential.cert(serviceAccount)
      });
      admin.messaging().subscribeToTopic(body.token, topic)
        .then(function (response) {
          console.log('Successfully subscribed to topic:', response);
          admin.app().delete().then(function () {
            var resBody = { "status": "subscribed" };
            callback(null, { "isBase64Encoded": false, "statusCode": 200, "headers": {}, "body": JSON.stringify(resBody) });
          }).catch(function (error) {
            console.log('Failed to release Firebase app resources:', error);
            callback(error);
          });
        })
        .catch(function (error) {
          console.log('Error subscribing to topic:', error);
          callback(error);
        });
    }
  }
}
Next, we need to provide a POST HTTP endpoint to receive tokens to be subscribed.
I’ve added a new resource (subscriptions) to the API and setup the POST method backed by the AWS Lambda function above.
Part 5: Delivering Firebase notifications to a topic
This code goes into another AWS Lambda function that will be invoked by the Adobe I/O Event processor function.
This code uses the recommended authentication method of Firebase (JWT + access token). I’ve split the code into an authenticator part and the main business logic.
auth.js:
const google = require('googleapis');
var MESSAGING_SCOPE = 'https://www.googleapis.com/auth/firebase.messaging';
var SCOPES = [MESSAGING_SCOPE];

function getAccessToken() {
  return new Promise(function (resolve, reject) {
    var key = require('./service-account.json');
    var jwtClient = new google.auth.JWT(
      key.client_email,
      null,
      key.private_key,
      SCOPES,
      null
    );
    jwtClient.authorize(function (err, tokens) {
      if (err) {
        reject(err);
        return;
      }
      resolve(tokens.access_token);
    });
  });
}

exports.getAccessToken = getAccessToken;
publish.js:
var auth = require('./auth');
const https = require('https');
var PROJECT_ID = 'YOURPROJECTID';

exports.handler = function (event, context, callback) {
  if (event.title && event.message) {
    auth.getAccessToken().then(function (accessToken) {
      var firebaseMessage = buildMessage(event.title, event.message);
      sendMessage(accessToken, firebaseMessage).then(callback(null), function (error) { callback(error); });
    });
  }
}

function buildMessage(title, message) {
  return {
    'message': {
      'topic': 'news',
      'notification': {
        'title': title,
        'body': message
      }
    }
  };
}

function sendMessage(accessToken, message) {
  var options = {
    hostname: 'fcm.googleapis.com',
    path: '/v1/projects/' + PROJECT_ID + '/messages:send',
    method: 'POST',
    headers: {
      'Authorization': 'Bearer ' + accessToken
    }
  };

  return new Promise(function (resolve, reject) {
    var request = https.request(options, function (resp) {
      resp.setEncoding('utf8');
      resp.on('data', function (data) {
        console.log('Message sent to Firebase for delivery, response: ' + data);
        resolve();
      });
    });

    request.on('error', function (error) {
      console.log('Unable to send message to Firebase: ' + error);
      reject(error);
    });

    request.write(JSON.stringify(message));
    request.end();
  })
}
Putting it all together
At this point we are ready to register our webhook on Adobe I/O. For this, open the registration that was created for receiving near real-time events, and add an event registration on the Events tab.
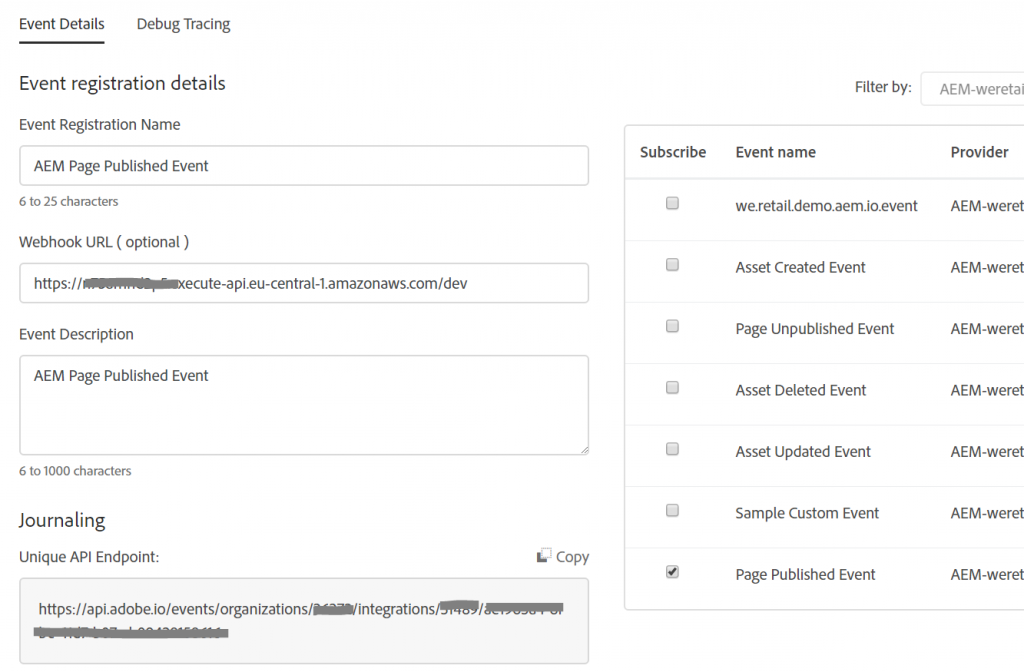
You should be able to find your AEM instance as event provider by its external host name setup on the AEM Link Externalizer. Check the Page published event.
Collect your Webhook’s URL from the AWS API gateway and enter under the event registration details.
Let’s see this educational prototype in action.
Navigate to the website via its Cloudfront URL, and allow displaying notifications. Then login to AEM author and publish a web page. In a few seconds the notification should arrive at your web page, or displayed on the desktop if the web page’s browser tab is not active.
Hi, I just looked at your site and really impressed by it’s design and content. You are doing a great job by providing such information to the world. Thank you so much.