In this post I’ve summarized the steps you can follow to setup your single-node Kubernetes cluster in AWS EC2 as a sandbox for educational or development purpose. I’ve reviewed several tutorials covering the same topic, but – probably because of the quick evolution of the platforms – none of them worked without adjustments, so I’ve documented the steps that worked for me at the time of writing this post.
How does this relate to the topics of my usual blog posts? Continue reading and you will find out.
Image by Monica Volpin from Pixabay
Introduction
I’m a fan of cloud computing, and serverless technologies. Working as an Adobe Experience Cloud architect I regularly face with the problem of choosing the right place for hosting business logic, complex backend workloads.
AEM has a modular, service oriented technology foundation (OSGi, REST) with numerous libraries that make it a reasonable choice for hosting services. But keep in mind that AEM’s main purpose is to act as a content repository, render web pages, support the editorial process and much more, but mostly related to content.
From many perspectives, AEM isn’t suitable to host complex backend workloads.
A potential choice for running backend services is Kubernetes. Kubernetes (or K8S) is commonly used for hosting microservices and service oriented applications.
Kubernetes (K8s) is an open-source system for automating deployment, scaling, and management of containerized applications.
For learning Kubernetes, a single-node sandbox with Minikube can be setup quickly on native Linux or a virtualized appliance.
Why do I pay 0.05$ per hour (t2.medium, EU Ireland, minimal data transfer) to have a Kubernetes sandbox?
I use multiple computers with different capabilities and OS (mostly Windows). Having a portable solution that relies on virtualization would be a challenge.
There are ready to use Kubernetes/Minikube environments available on GitHub described using Terraform or Cloudformation. My post will help you understand the steps to get there, but if you already know what you are doing, then you could use any of those pre-built templates.
Minikube is a tool that makes it easy to run Kubernetes locally. Minikube runs a single-node Kubernetes cluster inside a VM on your laptop for users looking to try out Kubernetes or develop with it day-to-day.
Steps to setup your environment
I’m going to use native package management so that you can check what is included in each step and you can troubleshoot if something goes wrong.
Create an EC2 instance
- Launch a new EC2 instance
- Select Ubuntu Server 18.04 LTS
- Choose t2.medium as instance type
- Use defaults (networking, storage, security group) and setup your SSH access.
Install Kubectl
First we need to install Kubectl, the command line tool for Kubernetes that allows us interacting with the cluster from the command line.
Login to your EC2 instance using your preferred SSH client, e.g. PuTTY.
The steps from https://kubernetes.io/docs/tasks/tools/install-kubectl/ work here without any adjustments needed.
sudo apt-get update && sudo apt-get install -y apt-transport-https
curl -s https://packages.cloud.google.com/apt/doc/apt-key.gpg | sudo apt-key add -
echo "deb https://apt.kubernetes.io/ kubernetes-xenial main" | sudo tee -a /etc/apt/sources.list.d/kubernetes.list
sudo apt-get update
sudo apt-get install -y kubectl
Install Minikube
It can be done based on https://kubernetes.io/docs/tasks/tools/install-minikube/.
The documentation recommends installing a hypervisor, but we are on a Linux environment with docker natively supported, therefore lets utilize this capability.
Install docker with the following command:
sudo apt-get install docker.io
Then download Minikube, make it executable and move it to the binaries:
curl -Lo minikube https://storage.googleapis.com/minikube/releases/latest/minikube-linux-amd64 && chmod +x minikube
sudo mv minikube /usr/local/bin
Run Minikube
Let’s continue in a persistent sudo shell.
sudo -i
As we are not behind a proxy, the minikube IPs have to be added to the NO_PROXY IP list.
root@ip-172-31-44-213:~# set NO_PROXY=localhost,127.0.0.1,10.96.0.0/12,192.168.99.1/24,192.168.39.0/24
Start Minikube:
root@ip-172-31-44-213:~# minikube start --vm-driver=none --docker-env NO_PROXY=$NO_PROXY
Check Minikube’s status:
root@ip-172-31-44-213:~# minikube status

host: Running
kubelet: Running
apiserver: Running
kubectl: Correctly Configured: pointing to minikube-vm at 172.31.26.236
If Minikube is up and running, we can deployment the first workload. Let’s deploy a Hello World container:
root@ip-172-31-44-213:~# kubectl create deployment hello-node --image=gcr.io/hello-minikube-zero-install/hello-node
Lets check the status of our deployment with the kubectl command:
root@ip-172-31-44-213:~# kubectl get all
NAME                              READY   STATUS              RESTARTS   AGE
pod/hello-node-78cd77d68f-hs22n   0/1     ContainerCreating   0          18s

NAME                 TYPE        CLUSTER-IP   EXTERNAL-IP   PORT(S)   AGE
service/kubernetes   ClusterIP   10.96.0.1    <none>        443/TCP   3m45s

NAME                         READY   UP-TO-DATE   AVAILABLE   AGE
deployment.apps/hello-node   0/1     1            0           18s

NAME                                    DESIRED   CURRENT   READY   AGE
replicaset.apps/hello-node-78cd77d68f   1         1         0       18s
As per the output above, the Hello World POD is up and running, but there is no hello-node service that is supposed to make the POD visible outside of the cluster.
Lets create a load balancer service with the ‘expose’ command.
root@ip-172-31-44-213:~# kubectl expose deployment hello-node --type=LoadBalancer --port=8080
And check the service:
root@ip-172-31-44-213:~# kubectl get services
NAME         TYPE        CLUSTER-IP    EXTERNAL-IP   PORT(S)          AGE
hello-node   NodePort    10.111.9.66   <none>        8080:32096/TCP   47s
kubernetes   ClusterIP   10.96.0.1     <none>        443/TCP          7m34s
Kubernetes allocated a port (32096) from the default service port node range (30000-32767) and forwards requests through this port to port 8080 in the cluster. That is where the Hello World service is listening.
At this point all we need to do is to edit the EC2 security group to allow accessing our first service from the Internet.
For simplicity, find out your external IP using https://www.whatismyip.com/ and allow accessing the Hello World service from your IP.
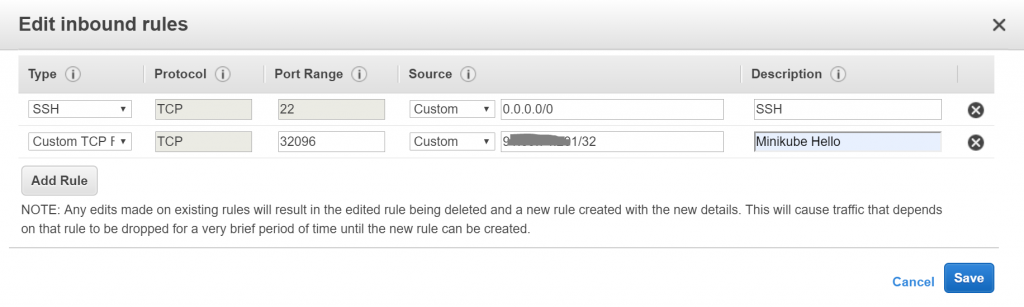
Open a web browser and navigate to your EC2 instance’s IP and port 32096 (or the port > 30000 allocated to your service as found out in the response of the ‘kuberctl get services’ command)
root@ip-172-31-44-213:~# kubectl create deployment hello-node –image=gcr.io/hello-minikube-zero-install/hello-node
This image no longer exists. This call should be updated to like:
kubectl create deployment hello-node –image=k8s.gcr.io/echoserver:1.4
Hi. Great article. A couple of items… First, the “set NO_PROXY…” should probably be “export NO_PROXY…”; otherwise the next command will set NO_PROXY to blank. Also, I think you may want to specify that the CIDRs in the NO_PROXY setting are constant, and why they’re there; see the middle of https://faun.pub/building-minikube-behind-a-proxy-bbeccab9a695 for a good explanation. Finally, the gcr.io/hello-minikube-zero-install/hello-node image doesn’t seem to exist anymore; I just used k8s.gcr.io/echoserver:1.4 for a test.